本文基于Brave勇敢爱Typecho主题,主题作者 秦枫鸢梦,修改教程主要作者 吡咯爱成环。
内容较多,请选择性食用。修改主题时请及时做好备份 。
一、现有功能改进 Typecho支持emoji设置 Typecho默认是不支持添加emoji的,这就会导致我们不能在主题中加入emoji,如果加入也会无法保存。
这主要是由于Typecho数据库编码是utf8,这种编码不支持emoji表情。
如果想Typecho支持emoji只需要将数据库的编码改为utf8mb4即可。
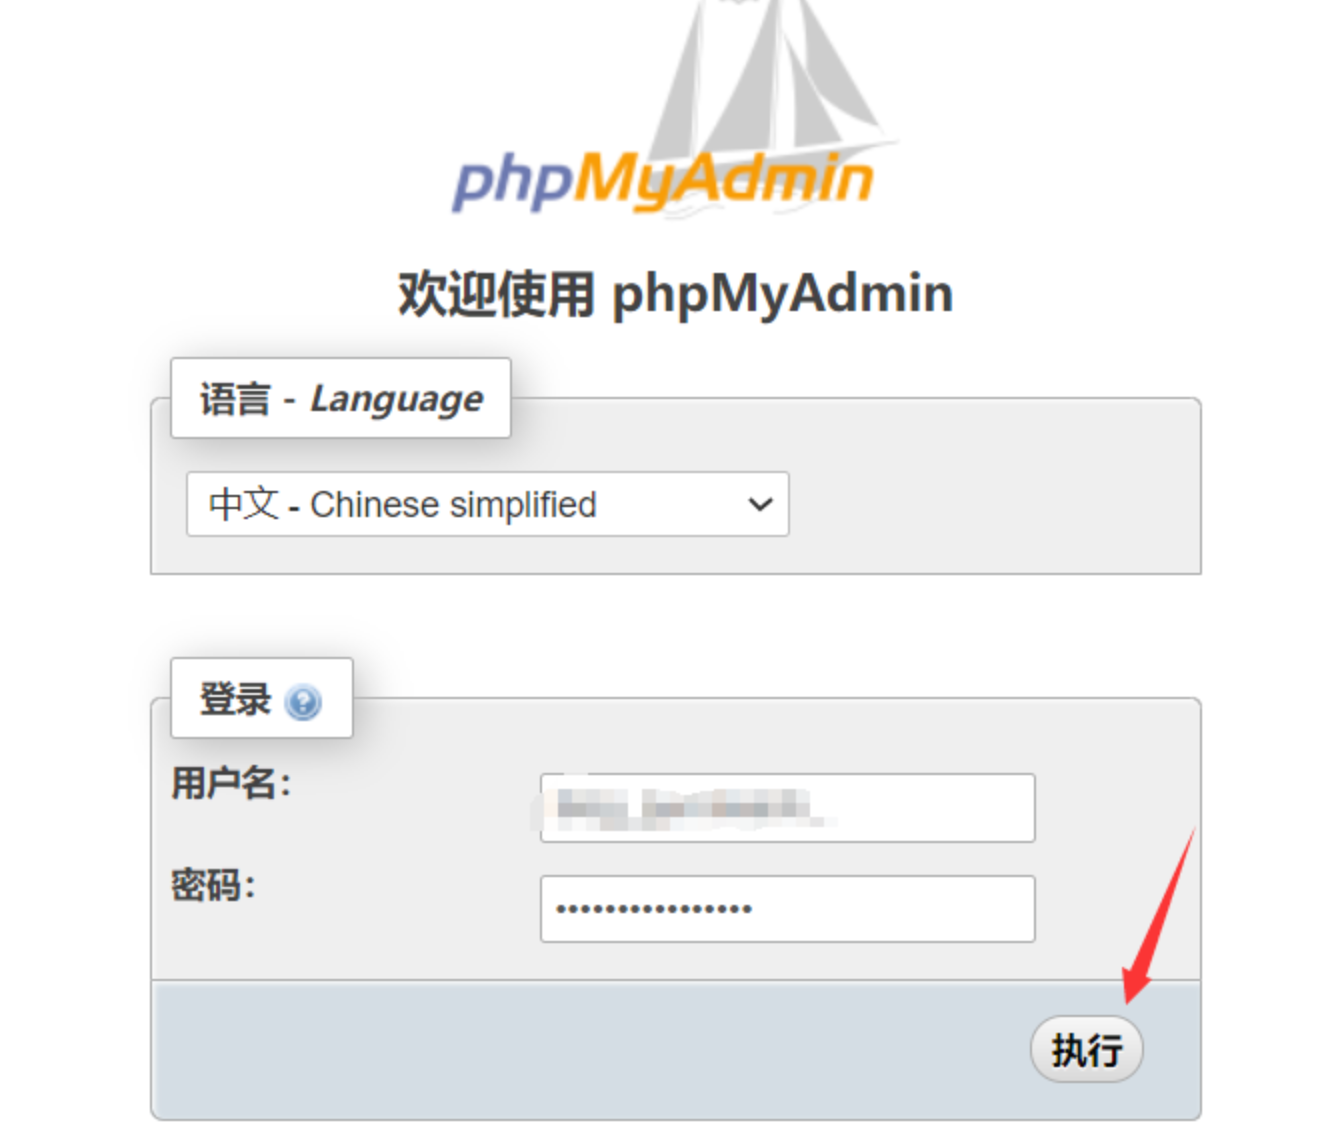
在宝塔面板的【数据库】中找到自己网站对应的数据库,在右侧点击管理 ,页面会跳转到数据库的登录页面,输入自己的数据库用户名和密码,点击执行
注 :如果数据库登录界面无法打开,可能是因为服务器的888端口 未开,请在阿里云轻量应用服务器工作台【防火墙】中添加一个888端口
登录后在左侧点击自己的数据库,可以看到右侧的排序规则是utf8,我们要改成utf8mb4
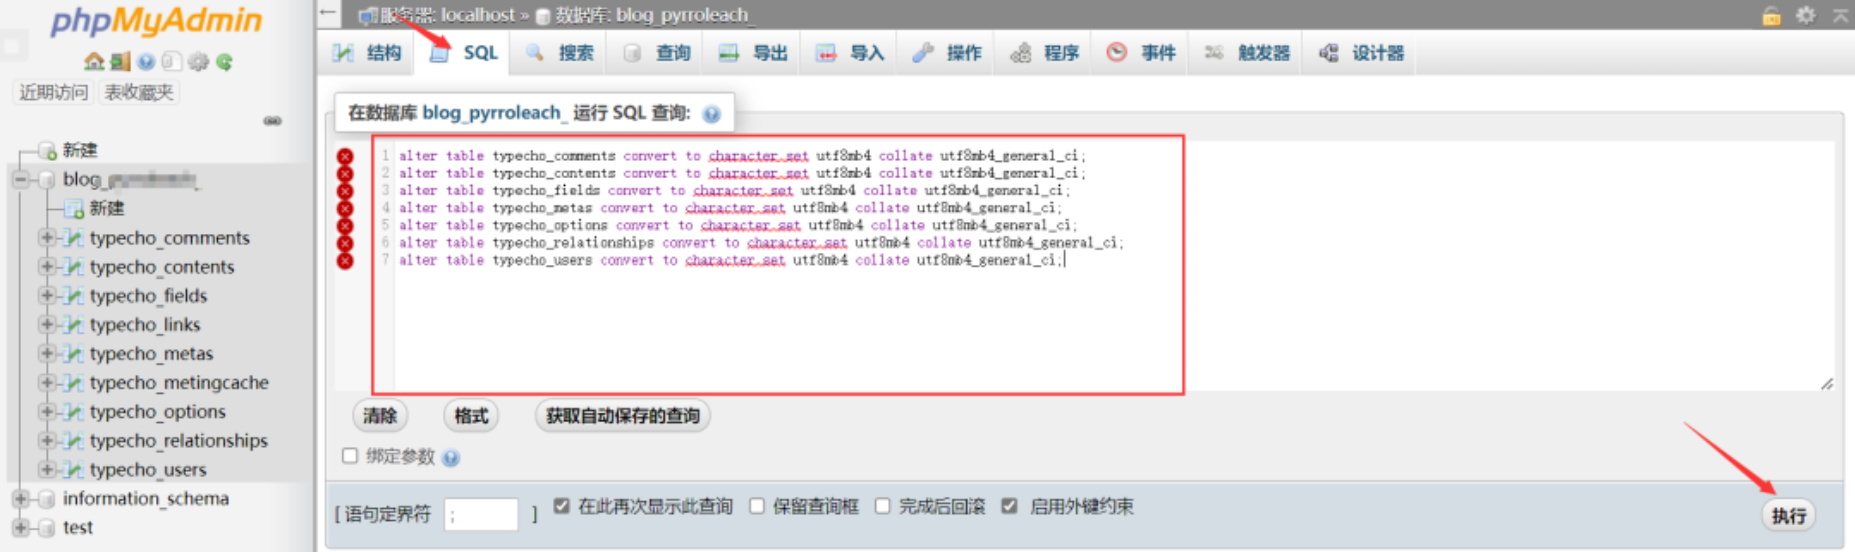
点击SQL,在代码框中输入编码转换代码,点击执行
1
2
3
4
5
6
7
alter table typecho_comments convert to character set utf8mb4 collate utf8mb4_general_ci; alter table typecho_contents convert to character set utf8mb4 collate utf8mb4_general_ci; alter table typecho_fields convert to character set utf8mb4 collate utf8mb4_general_ci; alter table typecho_metas convert to character set utf8mb4 collate utf8mb4_general_ci; alter table typecho_options convert to character set utf8mb4 collate utf8mb4_general_ci; alter table typecho_relationships convert to character set utf8mb4 collate utf8mb4_general_ci; alter table typecho_users convert to character set utf8mb4 collate utf8mb4_general_ci;
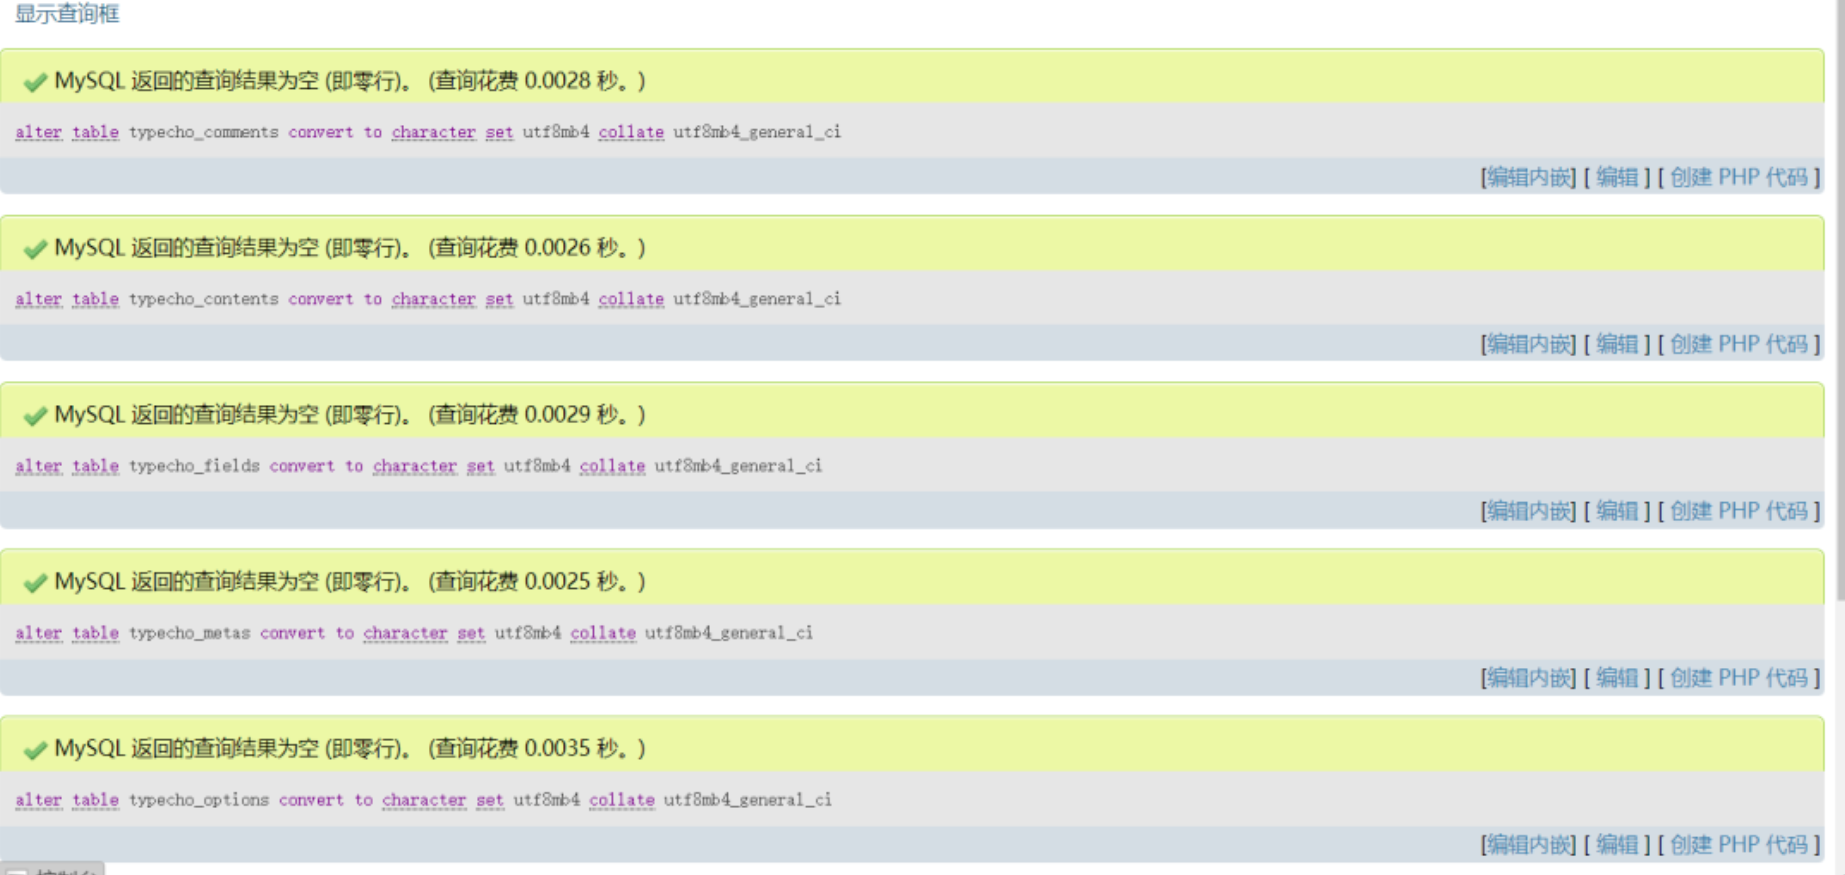
出现绿色对勾表示替换成功
在宝塔面板找到网站根目录数据库配置文件config.inc.php,将'charset' => 'utf8'改为'charset' => 'utf8mb4',该代码大约在config.inc.php的第60行,替换后将文件保存即可
1
2
3
4
5
6
7
8
9
10
/** 定义数据库参数 */ $db = new Typecho_Db('Pdo_Mysql', 'typecho_'); $db->addServer(array ( 'host' => 'localhost', 'user' => 'xxxxxxxxxxxx', 'password' => 'xxxxxxxxx', 'charset' => 'utf8mb4', /*将原来的utf8修改为utf8mb4*/ 'port' => 'xxxx', 'database' => 'xxxxxxxx', 在完成上述配置后即可为网站全局添加emoji表情,推荐一个emoji网址:`https://www.emojiall.com/`
在完成上述配置后即可为网站全局添加emoji表情,推荐一个emoji网址:https://www.emojiall.com/
字体引入修改 为了让网页显示更加美观,可以引入一下其他字体。以Brave主题为例进行简要介绍,首先要把你想呈现效果的字体上传到网络上,在CSS中使用 @font-face 定义这个字体,然后在后面的选择器进行调用。
上传到网络上主要有两种方式,一种是上传到自己的服务器上(不推荐,会占用服务器的带宽),一种是上传到云存储服务上,原作者使用的是自带CDN的又拍云云存储,而我因为对云存储服务不太了解,暂时使用本地服务器存储。在把字体上传后可以得到这个字体的链接(上传到自己的服务器可以使用相对链接,如上传到 style.css 同目录,链接就为 ./字体文件名),以ttf字体为例,在Brave主题中的style.css文件中加入以下代码
1
2
3
4
5
6
@font-face { font-family: '填字体名,不要带中文';/*给你的字体命名,后面调用的时候需要使用*/ font-style: normal; font-weight: normal; src: url("此处填入字体链接") format('truetype'); }
定义好字体后就可以在后面的选择器进行调用了
如我想让brave主题中全局都是上述定义的字体那可以在style.css文件中这样写
1
2
3
*{ font-family:'你之前定义的字体名'; }
如果只想让其在点点滴滴中的文章中起作用可以这样写
1
2
3
#article{ font-family:'你之前定义的字体名'; }
其他的你想让什么选择器起作用就在其中加入font-family:'你之前定义的字体名';
甚至你也可以在.php文件里定义单个标签的字体样式,只需要在标签里加入style=“font-family:'你之前定义的字体名';”
因为中文字体较为复杂,所以体积一般较大,这就意味着引入外部字体很明显的一个缺点就是会拖慢网站的加载速度,但是为了让女朋友看得赏心悦目,牺牲点加载速度也是能接受的。
页面美化 网站主页的美化 主要是增加了卡片阴影,使样式不太单调,有立体感。
在style.css中加入以下代码
1
2
3
4
5
6
.home-card{ border-radius: 8px !important; box-shadow: 1px 4px 15px rgb(125 147 178 / 30%); border:1px solid rgba(208,206,206,.4)!important; margin:10px; }
以祝福板为例在indexPage.php中找到
1 <a href="<?php $this->options->blessingPageLink() ?>" class="card">
将代码改为
1 <a href="<?php $this->options->blessingPageLink() ?>" class="card home-card">
即在class=“”中加了一个home-card
同理点点滴滴,lovelist等也可按照此方法更改。
点点滴滴页面的美化 如图,颜色自行修改
找到index.php,大约在第21行
1 <article style="padding: 20px;border-bottom: 1.2px solid rgba(0,123,255,.2);text-align: center;" class="post" itemscope itemtype="http://schema.org/BlogPosting">
将以上代码改为
1 <article style="padding: 20px;border-bottom: 1.2px solid rgba(0,123,255,.2);text-align: center;border-radius: 8px; box-shadow: 1px 4px 15px rgb(125 147 178 / 30%);margin-bottom: 25px;" class="post" itemscope itemtype="http://schema.org/BlogPosting">
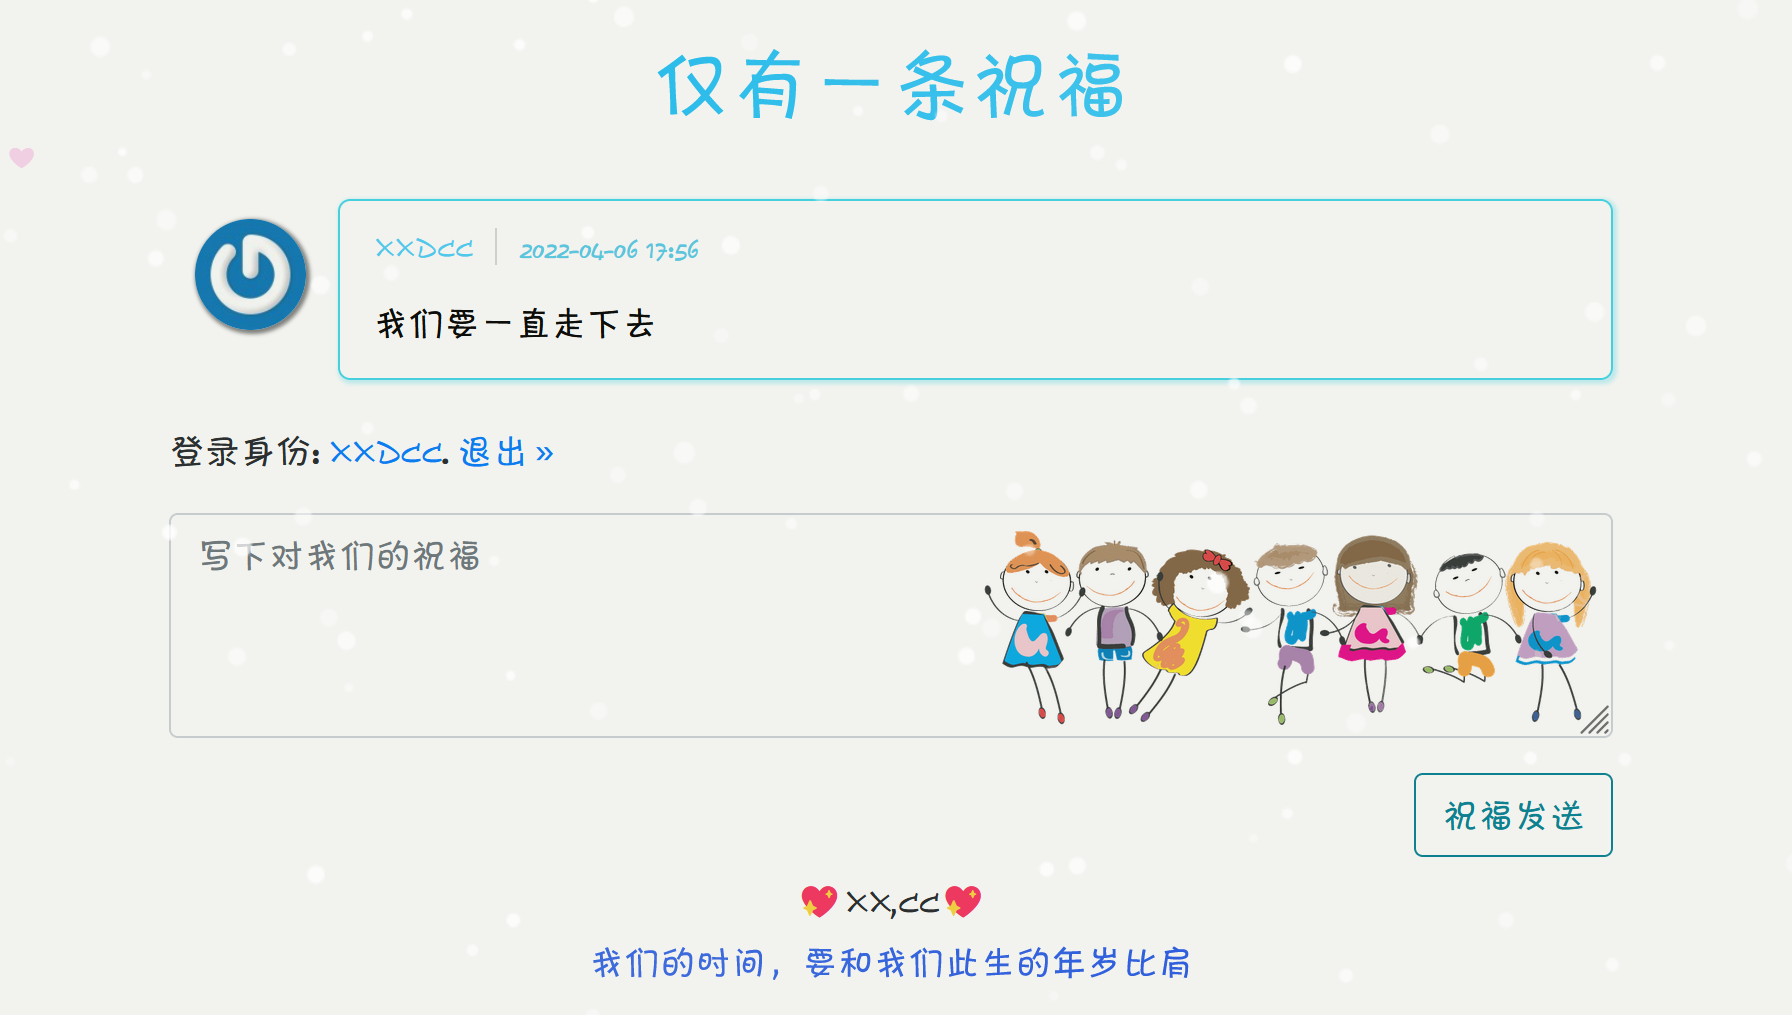
祝福板页面的美化
关于标题的累计已经收到x条祝福渐变字效果,可以在style.css中加入以下代码,我使用的是由red到orange的渐变,你可以自行修改其他的颜色以适配你的主题
1
2
3
4
5
6
7
8
9
.loveList-title { background: -webkit-linear-gradient(left, red, orange); background: -o-linear-gradient(right, red, orange); background: -moz-linear-gradient(right, red, orange); background: linear-gradient(to right, red, orange); -webkit-background-clip: text; background-clip: text; -webkit-text-fill-color: transparent; }
找到commentPage.php大约是第56行改为
1 <h5 class="loveList-title" style="display:block;text-align:center;margin-bottom:30px;"><?php $this->commentsNum(_t('暂无祝福'), _t('仅有一条祝福'), _t('累计已经收到<span class="bigfontNum"> %d </span>条祝福')); ?></h5>
关于祝福区的评论、头像以及填写祝福信息的表单的样式请在style.css中填入下列代码,注意:有部分代码与style.css文件是重复的,请善于利用查找和替换,避免代码冗余。
1
2
3
4
5
6
7
8
9
10
11
12
13
14
15
16
17
18
19
20
21
22
23
24
25
26
27
28
29
30
31
32
33
34
35
36
37
38
39
40
41
42
43
44
45
46
47
48
49
50
51
52
53
54
55
56
57
58
59
60
61
62
63
64
65
66
67
68
69
70
71
72
73
74
75
76
77
78
79
80
81
82
83
84
85
86
87
88
89
90
91
92
93
.name { font-size: 14px; color: #fb984b; font-weight: 500; line-height: 1; border-right: 1px solid #d8d8d8; margin-right: 10px; padding-right: 10px; } .name a{ color: #fb984b; } .name a:hover{ color: #d05e05; } .commentlist .comment { clear: both; margin: 25px 0; margin-left: 76px; position: relative; margin-bottom: 20px; padding: 8px 15px 2px 15px; border-radius: 5px; border: 1px solid #fedcc2; box-shadow: 1px 1px 2px 1px #fff5ee; } .commentlist .comment .comment-avatar { position: absolute; left: -80px; } .commentlist .comment .comment-avatar .avatar { border-radius: 30px; -moz-border-radius: 30px; -webkit-border-radius: 30px; width: 60px; height: 60px; box-shadow: 1px 1px 2px 1px gray; } textarea.form-control { resize: vertical; background-size: contain; background-repeat: no-repeat; background-position: right; margin-bottom: 2px; background-image: url(https://s2.loli.net/2022/02/22/RQjK5uWAXCHvDxh.png); transition: all 0.25s ease-in-out 0s; } textarea.form-control:focus { border: 1px solid #fedcc2; box-shadow: 1px 1px 2px 1px #fff5ee; background-position-y: 200px; transition: all 0.25s ease-in-out 0s; } #mail.form-control:focus,#author.form-control:focus,#url.form-control:focus{ border: 1px solid #fedcc2; box-shadow: 1px 1px 2px 1px #fff5ee; } #url.form-control,textarea.form-control,#author.form-control,#mail.form-control{ margin:16px auto !important; } .btn-outline-danger { color: #fa862b !important; border-color: #fa862b !important; } .btn-outline-danger:hover{ background-color:#fb984b !important; color:#fff!important; } .commentlist em { margin-left:-3px; color: #fcac6e; font-size: 12px; font-style: normal; } .commentlist p { color: #757e91; font-size: 14px; line-height: 1.6; margin-bottom: 0; }
在祝福填写表单图片背景使用了handsome主题的评论背景,以上样式我使用了橙色作为主题色,你可以改为其他颜色,增加你主题的多样性。
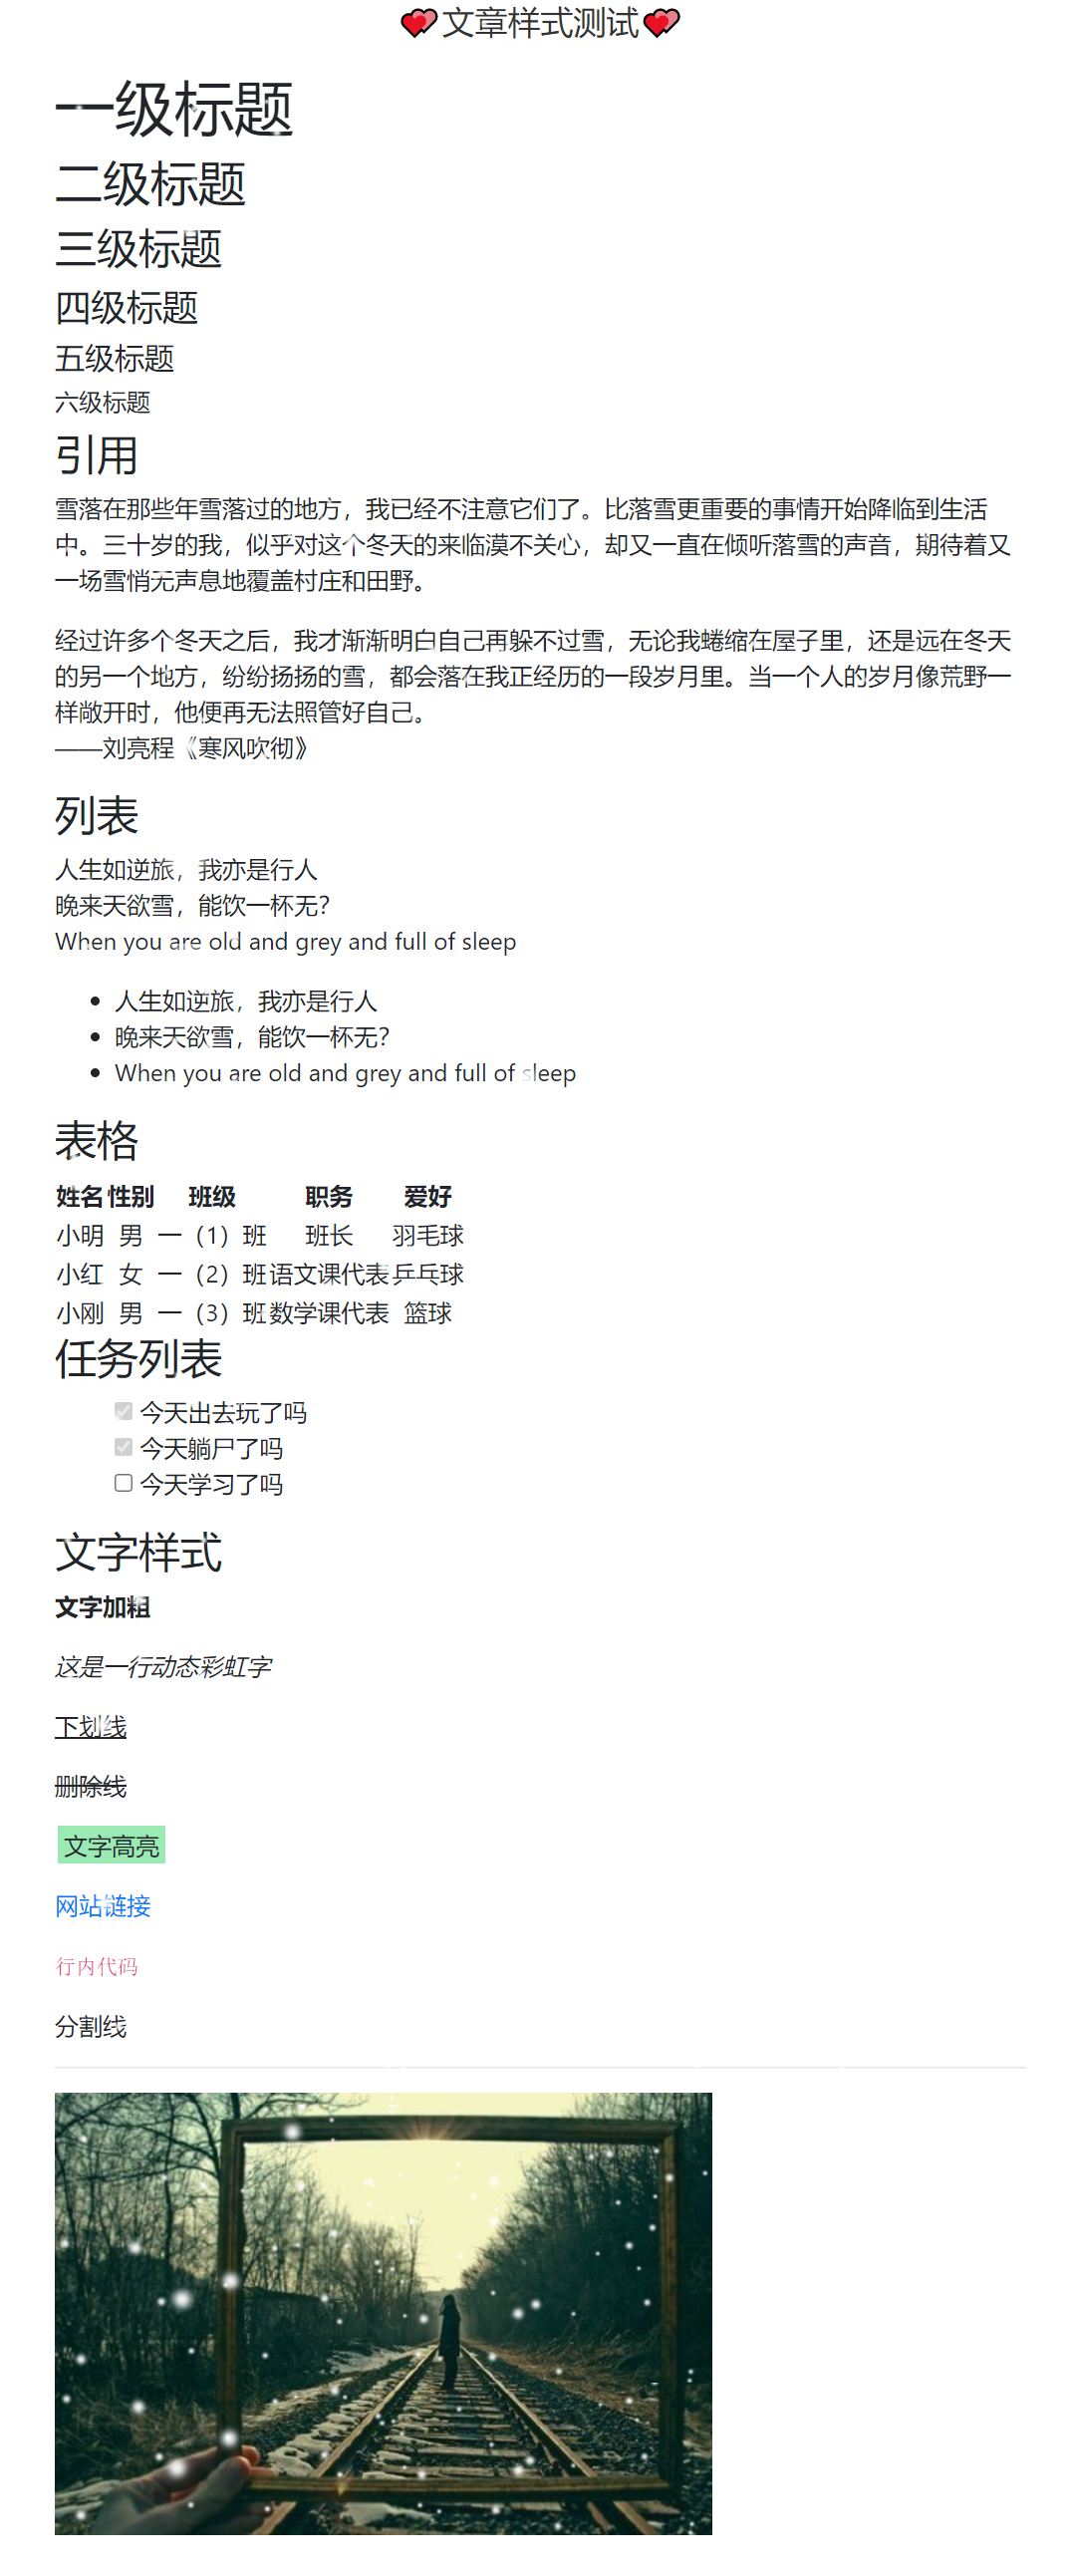
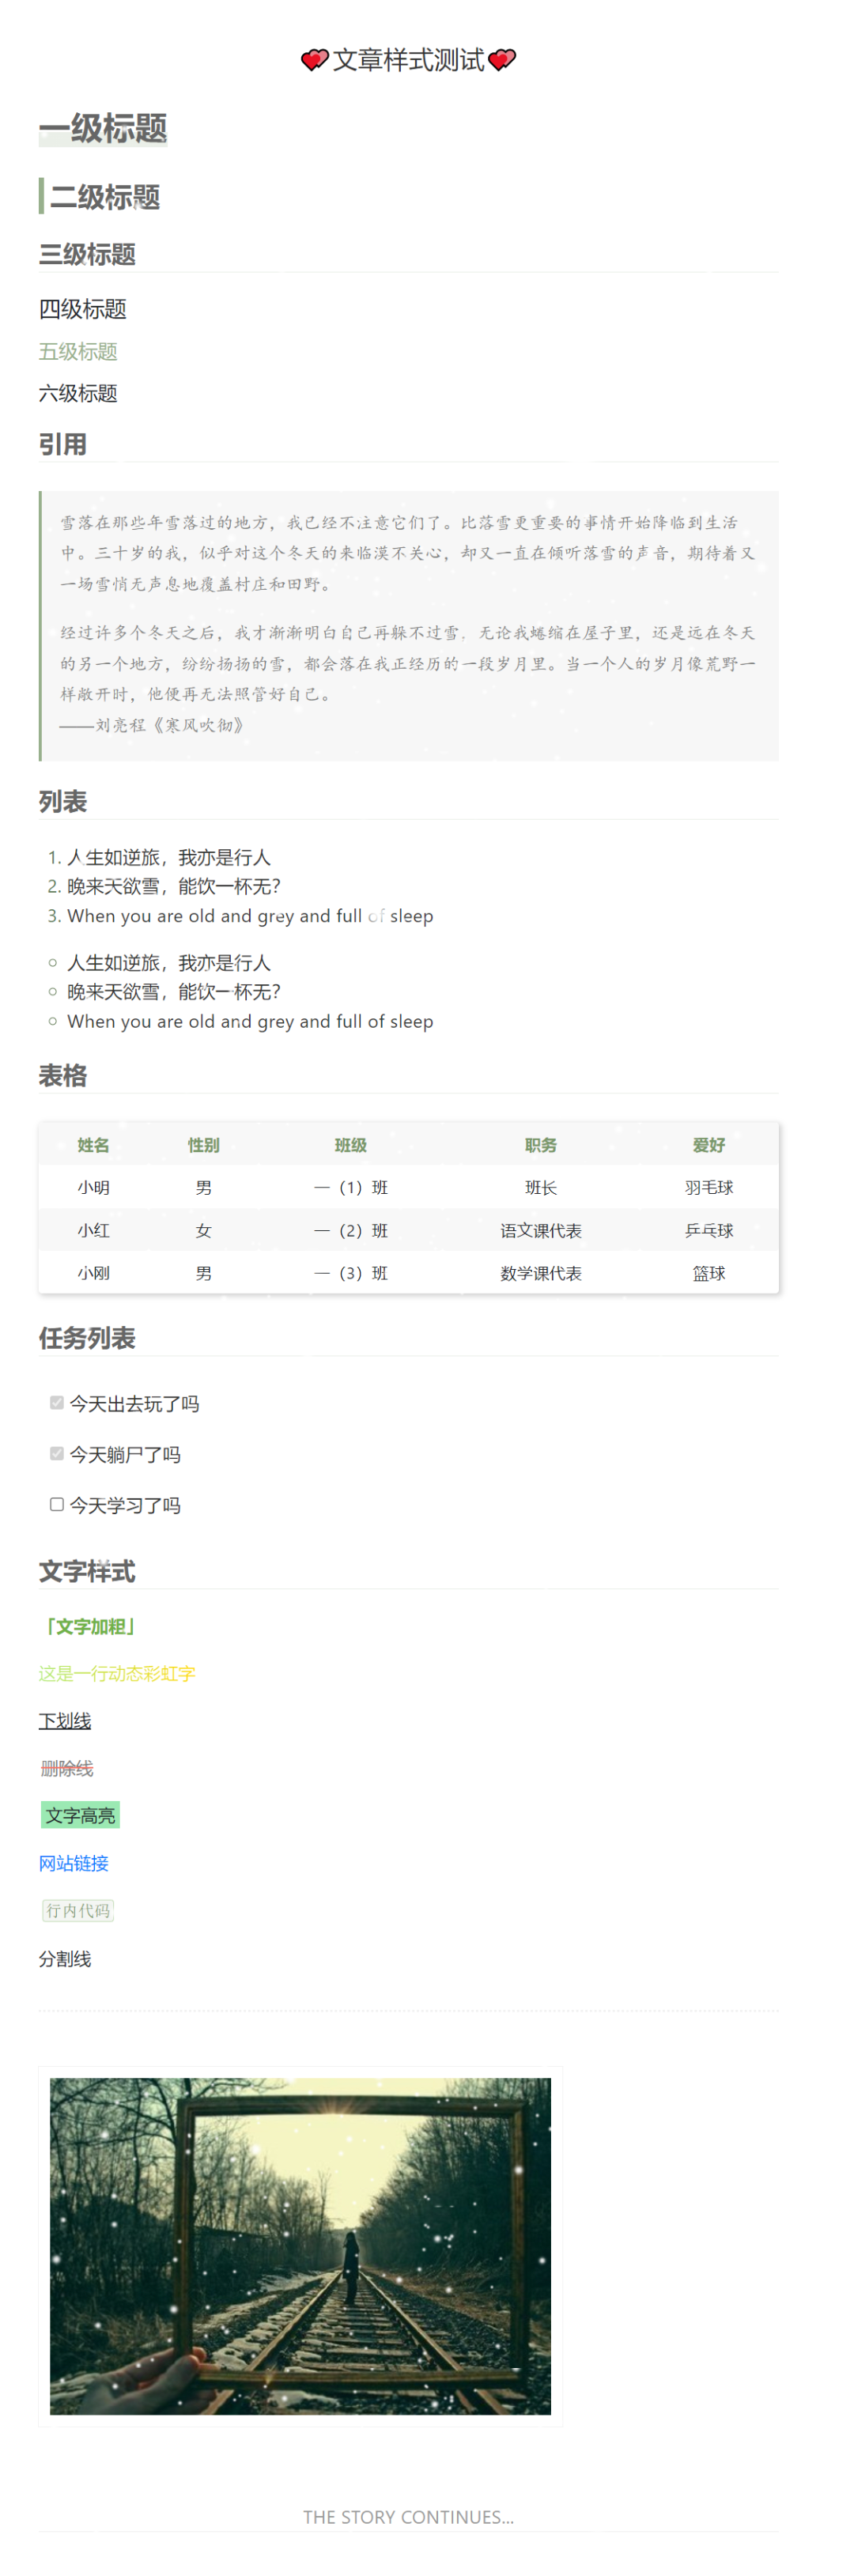
为主题添加文章样式 本来是不打算改主题文章样式的,因为这个网站只是用来记录我们俩个人的生活和想法,能记录文字就行。但经过测试发现这不是样式简不简陋的问题了,这特喵的根本没有样式好不好
原主题文章样式长这样:
默认修改样式 经过样式重写后文章样式:
如果想使用我的主题样式,请将下面的代码复制到/usr/themes/Brave/base/style.css中
1
2
3
4
5
6
7
8
9
10
11
12
13
14
15
16
17
18
19
20
21
22
23
24
25
26
27
28
29
30
31
32
33
34
35
36
37
38
39
40
41
42
43
44
45
46
47
48
49
50
51
52
53
54
55
56
57
58
59
60
61
62
63
64
65
66
67
68
69
70
71
72
73
74
75
76
77
78
79
80
81
82
83
84
85
86
87
88
89
90
91
92
93
94
95
96
97
98
99
100
101
102
103
104
105
106
107
108
109
110
111
112
113
114
115
116
117
118
119
120
121
122
123
124
125
126
127
128
129
130
131
132
133
134
135
136
137
138
139
140
141
142
143
144
145
146
147
148
149
150
151
152
153
154
155
156
157
158
159
160
161
162
163
164
165
166
167
168
169
170
171
172
173
174
175
176
177
178
179
180
181
182
183
184
185
186
187
188
189
190
191
192
193
194
195
196
197
198
199
200
201
202
203
204
205
206
207
208
209
210
211
212
213
214
215
216
217
218
219
220
221
222
223
224
225
226
227
228
229
230
231
232
233
234
235
236
237
238
239
240
241
242
243
244
245
246
247
248
/*文章样式部分*/ /*开始*/ /* 全局声明 */ #article{ line-height: 1.6rem; letter-spacing: .3px; } /* 标题 */ #article h1,h2,h3{ color:#666; font-weight:700 !important; } #article h1:before { display:block; content:""; margin-top:30px } #article h1:nth-of-type(1)::before { display:block;margin-top:10px; } #article h1{ font-size:28px !important; color:#666; line-height:1.4; margin: 2rem auto 1.4rem !important; background:linear-gradient(to bottom,transparent 65%,rgba(152,176,141,.2) 0) no-repeat; width:auto; display:inline; } #article h1:after { display:block; content:""; margin-bottom:10px; } #article h2{ font-size: 24px !important; margin: 1.6rem auto 1.2rem !important; border-left: 5px solid #98B08D; padding: .1rem .3rem ; } #article h3 { margin: 1.4rem auto 1.2rem !important; font-size:21px !important; font-weight:bold; padding-bottom:3px; border-bottom:1px solid rgba(233,238,231); } #article h4{ margin: 1rem auto 1rem !important; font-size:19px !important; } #article h5{ margin: 1rem auto 1rem !important; font-size:17px; color:#98B08D; } #article h6{ margin: 1rem auto 1rem !important; font-size:17px; } /* 段落 */ #article p{ font-size:15px; } /* 引用 */ #article blockquote{ font-family: "Helvetica", Arial, "kaiti","pingfangSC light", "microsoft yahei" !important; margin: 1.6rem auto 1.2rem !important; padding: 15px 10px 1px 15px; line-height: 27px; background-color:#F7F7F7; border-left:3px solid #98B08D; color:#808080; display:block; } /* 行内代码 */ #article li code,p code{ color: #789769 !important; background-color: rgba(233,238,231,0.5); font-family: "LM Mono 10","microsoft yahei","Times New Roman",Arial, simsun, "pingfangSC light", sans-serif; font-size: 0.875rem; box-sizing: border-box; margin: 0 4px; padding: 1px 2px ; border-radius: 2px; box-shadow: 0 0 .8px .8px rgba(129,181,103,.5); } /*列表*/ #article ol, #article ul { padding-left: 25px; margin: .5rem 0; } #article ol>li, #article ul>li { color: #333; } #article li::marker{ color: #617a55; } #article ol { margin: 1.2rem auto 1rem !important; padding-left: 25px !important; list-style-type: decimal !important; } #article ul { list-style-type: circle; } #article ul ul, #article ol ul{ list-style-type: disc; } #article ul ul ul, #article ol ul ul, #article ol ol ul, #article ul ol ul{ list-style-type: square; } /*表格*/ #article table { margin: 1.6rem auto !important; width: 100%; overflow: auto; display: table; font-size: 14px; border-spacing: 0; border-collapse: collapse; word-break: normal; word-wrap: normal; border-radius: 3px; box-shadow: 2px 2px 5px 1px #8c8c8c61; } #article table td, table th { border-radius: 3px; padding: 6px 13px; word-break: keep-all; } #article table th { font-weight: 700; color:#789769; background-color: #f8f8f8; } #article table tr:nth-child(2n) { background-color: #f8f8f8; } /* 分割线 */ #article hr { margin: 2rem 0 !important; border-top: 2px dotted #F2F2F2 !important; } #article pre{ margin: 1.2rem auto 1.6rem!important; padding:10px 15px; background-color:#F2F2F2 !important; border-radius:5px; } /* 图片 */ #article img { margin:1rem auto; border: 10px solid #ffffff!important; outline: 1px solid #F2F2F2; } /* 文字加粗 */ #article strong{ color: #6FB147; font-weight: bold; } #article strong::before { content: '「'; } #article strong::after { content: '」'; } /* 动态彩虹字 考虑到斜体用的比较少,将斜体语法改为显示动态彩虹字 */ #article em { font-style:normal; background-image: linear-gradient(to left, orangered, orange, gold, lightgreen, cyan, dodgerblue, mediumpurple, hotpink, orangered); background-size: 110vw; -webkit-background-clip: text; background-clip: text; color: transparent; -webkit-animation:rainbow 60s linear infinite; animation: rainbow 60s linear infinite; } @keyframes rainbow { 100% { background-position: -2000vw; } } button, input, optgroup, select, textarea { margin: 1rem 0 1rem -15px !important; } /* 删除线 */ del { padding: 1px 2px; text-decoration: line-through #F87466; color:#808080; } /* 文章最后加上THE STORY CONTINUES... */ #article:after{ content:'THE STORY CONTINUES...'; font-size:16px; display:block; text-align:center; margin-top:50px; color:#999; border-bottom:1px solid #eee; } /*结束*/
考虑到不经常使用斜体,所以我把斜体的样式改成了动态彩虹字效果,语法是在想要的文字效果前各加一个*
想要实现文字高亮的效果请在style.css文件中加入以下代码
1
2
3
4
5
6
/*文字高亮*/ .highlight{ background-color: #9BE9B3; padding: 2px 4px; margin: 0 2px; }
在书写文章时写入以下语法就可给文字加上高亮:
1 <span class="highlight">`这里的文字都会有高亮效果`</span>
自行修改页面及文章样式 因为大家喜欢颜色的不同也会造成网站主题颜色的不同,因此大家也会想要对页面内元素或者文章样式内的颜色进行修改,原作者已经在原有的代码中已经注释出每段代码所对应的部分,只需要修改颜色就行。但是css文件修改后需要清楚浏览器缓存才会生效,所以会很麻烦,大家修改时可以使用浏览器 f12 元素选项直接选中页面元素 定位属性位置 以及 直接修改进行暂时预览 。
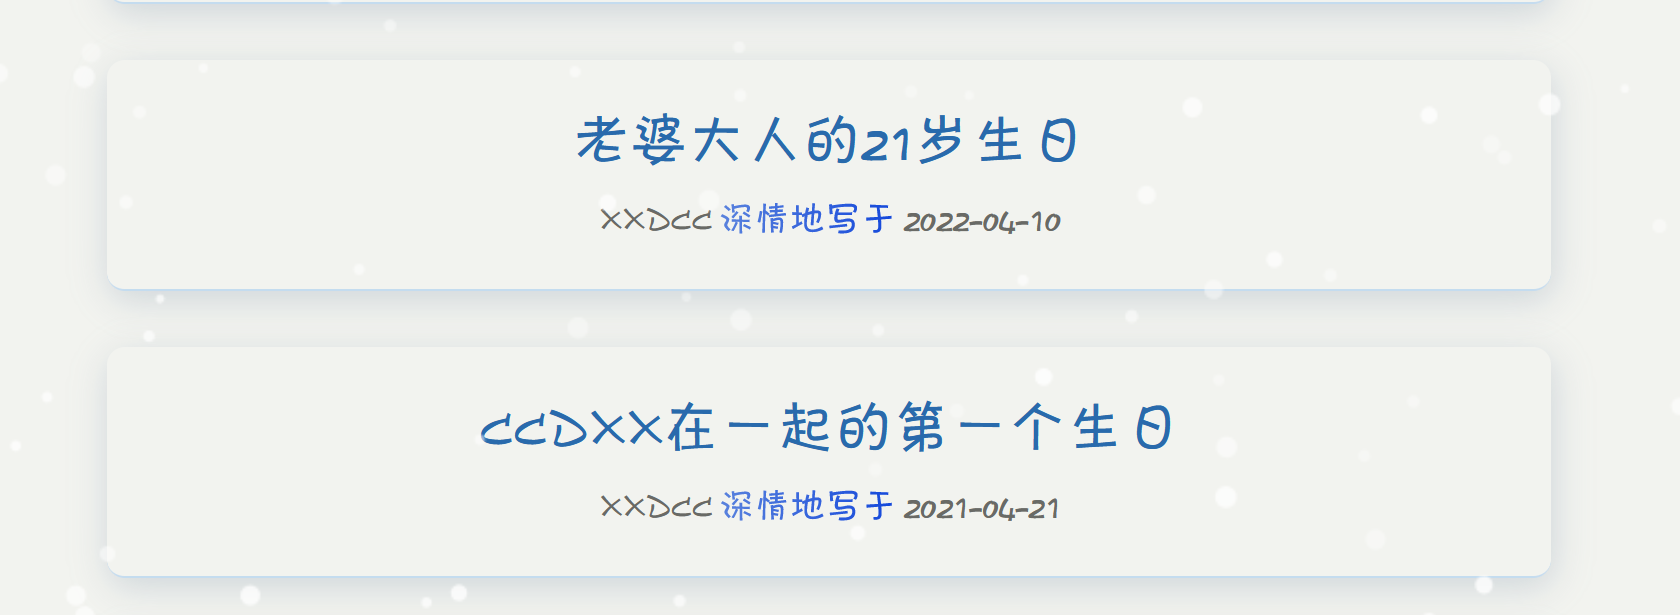
为点点滴滴页面文章添加作者 Brave主题发布的文章可以在点点滴滴页面中查看,作者还贴心的加入了文章写作时间以及在时间前加一个深情地写于 ,觉得很浪漫
如果在深情地写于 前加入谁谁写的那就更完美了,本来这个主题网站就应该两人一起来记录。加入作者的方法如下:
登录网站后台,选择【管理】【用户】进入到管理用户界面,选择新增,添加新的用户,填入基本信息(记住自己账号和密码),用户组选择管理员 ,最后点击增加用户,为另一半创建新账户。
登录宝塔面板,在【文件】的网站根目录找到并打开/usr/themes/Brave/index.php,大约在代码第23行,找到深情地写于,在前面加入<?php $this->author();后保存
1 <time datetime="<?php $this->date('c'); ?>" itemprop="datePublished" > <?php $this->author(); ?> 深情地写于 <?php $this->date(); ?></time>
登录不同的账户撰写文章,在文章发布后就会显示是谁写的
为lovelist页面清单增加完成时间 原主题的恋爱清单只能显示清单有无完成和插入一张图片,较为单调,那么可以让他显示完成事件或者别的东西。
在宝塔面板找到并打开/usr/themes/Brave/core/App.php,在$out .= '<div class="card-body p-0">'(大约第58行)下方插入如下代码
1 $out .= '<div class="lover-card-title" style="padding:10px 8px 10px 8px;">清单完成时间:'.$value['listct'].'</div>';
重新编辑恋爱清单页面,清单完成时间的关键字是listct
示例:
1
2
3
4
5
[loveList] [item status="1" img="图片url" listct="2022-04-10"]相互写情书🖊️[/item] [/loveList]
文字默认居中对齐,如果想文字左对齐就在 style="" 加入 text-align:left;
当然除了写清单完成时间,也可以写一些对清单的描述。此外,完成时间字体颜色、样式等可以参照上文。
首页心脏动画自动跳动样式修改 Brave主题首页心脏图标默认为有 鼠标移入移出 事件时会进行跳动动画,个人感觉略显不妥,所以将其修改为始终跳动。
方法如下:
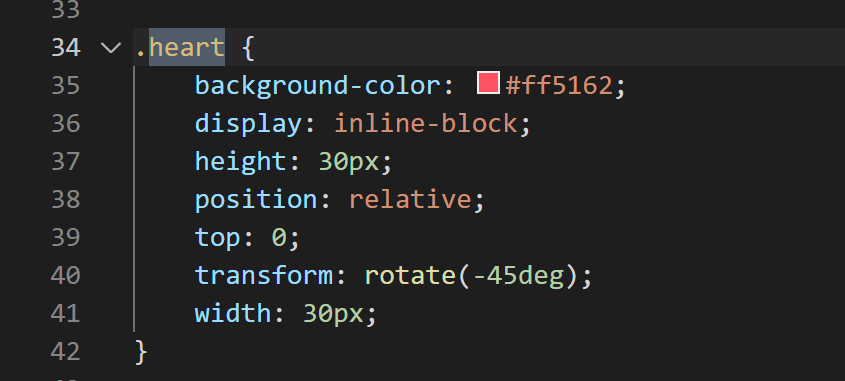
在 brave/base/style.css 文件中搜索 heart ,找到图中位置,文件未修改的话大概在第 34 行的位置
在 .heart 属性中加入
1
2
animation:cardiac 1s infinite; -webkit-animation:cardiac 1s infinite; /* Safari and Chrome */
即改为:
删除图中代码,负责自动跳动和鼠标移入会出现冲突看起来很奇怪:
并在其下方添加如下事件:
1
2
3
4
5
6
7
8
9
10
11
12
13
14
15
16
17
18
19
20
21
22
23
24
25
@keyframes cardiac { 0% { transform: scale( 1) rotate(-45deg); } 20% { transform: scale( 1.25) rotate(-45deg); } 40% { transform: scale( 1.5) rotate(-45deg); } } @-webkit-keyframes cardiac /* Safari and Chrome */ { 0% { transform: scale( 1) rotate(-45deg); } 20% { transform: scale( 1.25) rotate(-45deg); } 40% { transform: scale( 1.5) rotate(-45deg); } }
填入文字调用API接口 在调试api的过程中,遭遇了莫名其妙的问题,最后在其他人的帮助下用这种方式实现调用,因此本文所用方法不保证对其他api接口有效
将 nav.php 文件中图中位置代码修改为如图所示
1
2
3
4
5
6
7
8
<div class="collapse navbar-collapse" id="navbarText"> <ul class="navbar-nav mr-auto"> </ul> <span class="navbar-text"> <script>sweet()</script> <?php $this->options->navsay() ?> </span> </div>
在 head.php 文件 head 标签中添加引用
1 <script type="text/javascript" src="https://api.ppilab.com/sweet.php?token=你的密钥&format=js&charset=utf-8"></script>
二、功能增加 网站底部添加一言 在宝塔面板【文件】的网站根目录找到 /usr/themes/Brave/base/footer.php ,双击进行编辑,第2行 <div class="p-5 text-center "> 下即可更改网站底部的文字
1
2
3
4
5
6
<div class="p-5 text-center "> <h6><?php $this->options->title() ?></h6> /*引入网站名*/ <h6>你惊艳了我的时光,也温柔了我的岁月</h6> /*加入你想加入的文字,可自改*/ <a class="lover-card-title" href="http://beian.miit.gov.cn/" target="_blank"> 皖ICP备2021016244号-1</a> /*添加备案号*/ <!--<p class="h6"> Powered by <a href="http://typecho.org" target="_blank">Typecho</a> ※ Theme is <a href="https://blog.zwying.com" target="_blank">Brave</a></p>--> /*主题放版权的地方,如果觉得放在自己的情侣网站不和谐可以删除或注释起来*/ </div>
如果你想给自己的文字加入颜色渐变效果可以这样写 <h6 class="lover-card-title"> 你惊艳了我的时光,也温柔了我的岁月</h6>
添加下雪特效 默认下雪特效 是在/usr/themes/Brave/base/footer.php修改,在</body>前添加
1
2
3
4
5
<script src="https://pt.pyrroleach.com/js/snowy.js"></script> <style type="text/css"> .snow-container{position:fixed;top:0;left:0;width:100%;height:100%;pointer-events:none;z-index:100001;} </style> <div class="snow-container"></div>
动画下雪特效 还有一种下雪特效挺有意思,在鼠标接近雪花时会将雪花吹跑。方法同样是在在</body>前添加一段JavaScript代码,如下:
1
2
3
4
5
6
7
8
9
10
11
12
13
14
15
16
17
18
19
20
21
22
23
24
25
26
27
28
29
30
31
32
33
34
35
36
37
38
39
40
41
42
43
44
45
46
47
48
49
50
51
52
53
54
55
56
57
58
59
60
61
62
63
64
65
66
67
68
69
70
71
72
73
74
75
76
77
78
79
80
81
82
83
84
85
86
87
88
89
90
91
92
93
94
95
96
97
98
99
100
101
102
103
104
105
106
107
108
109
110
111
112
113
114
115
116
117
118
119
120
121
122
123
124
125
126
127
128
129
130
131
132
<canvas id="Snow"></canvas> <script> if(true){ (function() { var requestAnimationFrame = window.requestAnimationFrame || window.mozRequestAnimationFrame || window.webkitRequestAnimationFrame || window.msRequestAnimationFrame || function(callback) { window.setTimeout(callback, 1000 / 60); }; window.requestAnimationFrame = requestAnimationFrame; })(); (function() { var flakes = [], canvas = document.getElementById("Snow"), ctx = canvas.getContext("2d"), flakeCount = 200, mX = -100, mY = -100; canvas.width = window.innerWidth; canvas.height = window.innerHeight; function snow() { ctx.clearRect(0, 0, canvas.width, canvas.height); for (var i = 0; i < flakeCount; i++) { var flake = flakes[i], x = mX, y = mY, minDist = 150, x2 = flake.x, y2 = flake.y; var dist = Math.sqrt((x2 - x) * (x2 - x) + (y2 - y) * (y2 - y)), dx = x2 - x, dy = y2 - y; if (dist < minDist) { var force = minDist / (dist * dist), xcomp = (x - x2) / dist, ycomp = (y - y2) / dist, deltaV = force / 2; flake.velX -= deltaV * xcomp; flake.velY -= deltaV * ycomp; } else { flake.velX *= .98; if (flake.velY <= flake.speed) { flake.velY = flake.speed } flake.velX += Math.cos(flake.step += .05) * flake.stepSize; } ctx.fillStyle = "rgba(255,255,255," + flake.opacity + ")"; flake.y += flake.velY; flake.x += flake.velX; if (flake.y >= canvas.height || flake.y <= 0) { reset(flake); } if (flake.x >= canvas.width || flake.x <= 0) { reset(flake); } ctx.beginPath(); ctx.arc(flake.x, flake.y, flake.size, 0, Math.PI * 2); ctx.fill(); } requestAnimationFrame(snow); }; function reset(flake) { flake.x = Math.floor(Math.random() * canvas.width); flake.y = 0; flake.size = (Math.random() * 3) + 2; flake.speed = (Math.random() * 1) + 0.5; flake.velY = flake.speed; flake.velX = 0; flake.opacity = (Math.random() * 0.5) + 0.3; } function init() { for (var i = 0; i < flakeCount; i++) { var x = Math.floor(Math.random() * canvas.width), y = Math.floor(Math.random() * canvas.height), size = (Math.random() * 3) + 2, speed = (Math.random() * 1) + 0.5, opacity = (Math.random() * 0.5) + 0.3; flakes.push({ speed: speed, velY: speed, velX: 0, x: x, y: y, size: size, stepSize: (Math.random()) / 30 * 1, step: 0, angle: 180, opacity: opacity }); } snow(); }; document.addEventListener("mousemove", function(e) { mX = e.clientX, mY = e.clientY }); window.addEventListener("resize", function() { canvas.width = window.innerWidth; canvas.height = window.innerHeight; }); init(); })(); } </script> <style> #Snow{ position: fixed; top: 0; left: 0; width: 100%; height: 100%; z-index: 99999; background: rgba(125,137,95,0.1); pointer-events: none; } </style>
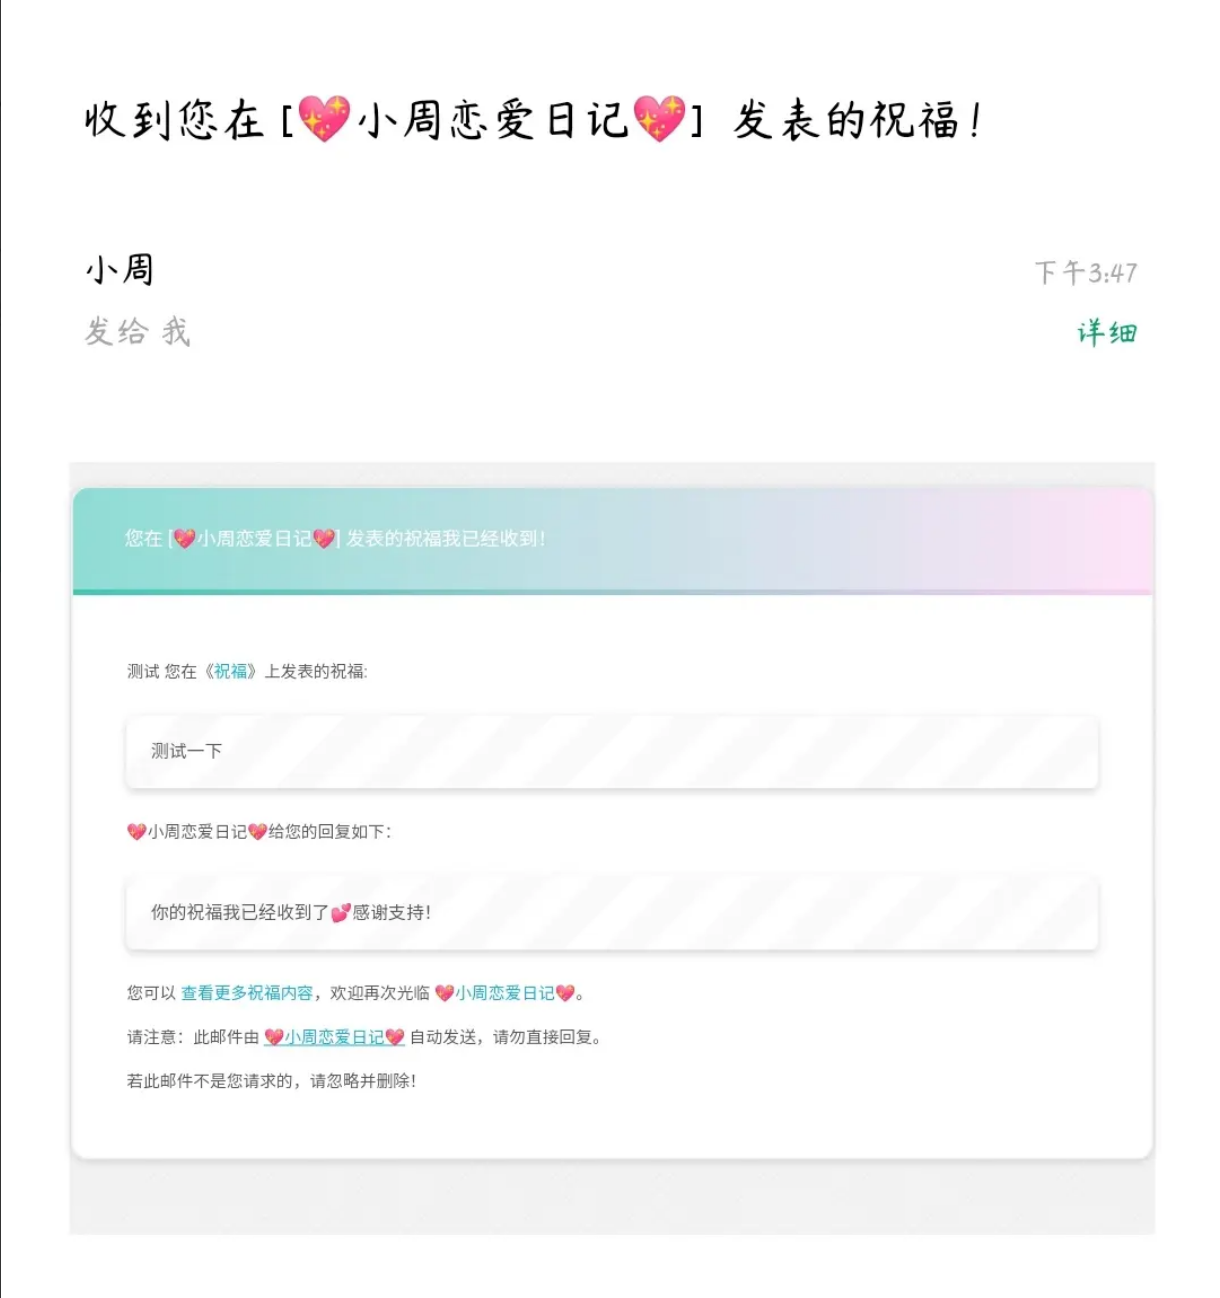
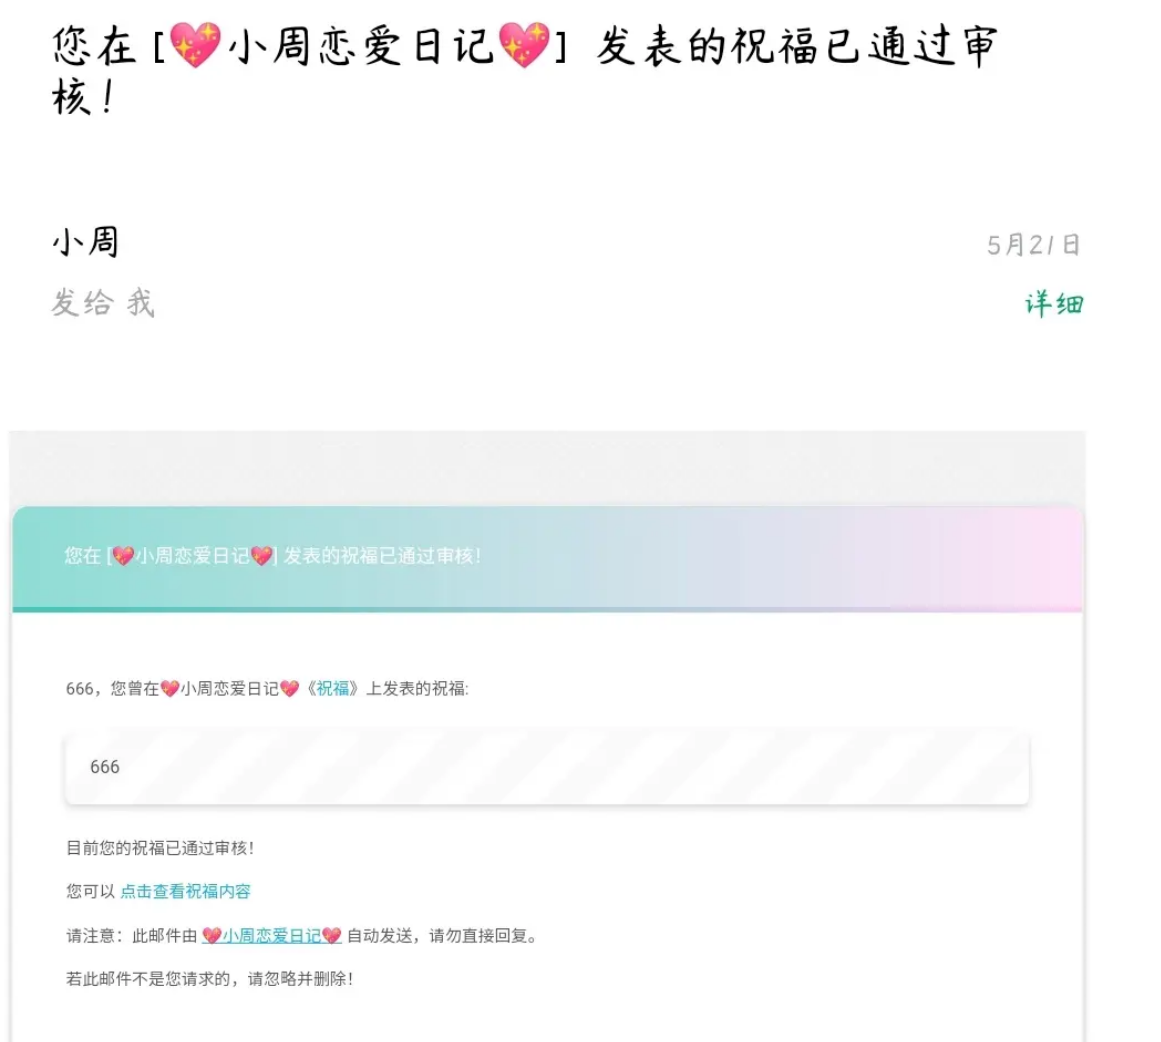
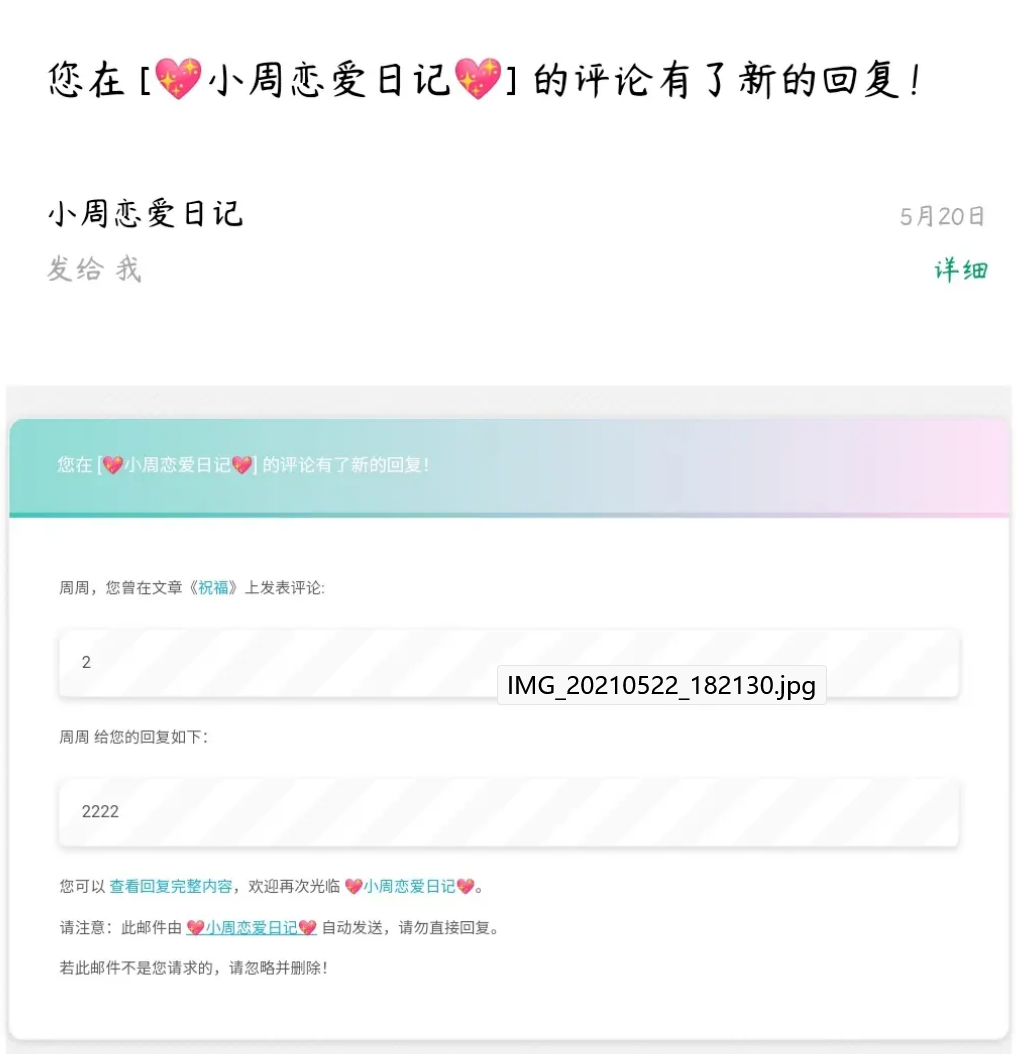
祝福自动回复邮件 插件简介 LoveXXzhoudedi是一款Typecho邮件通知类插件这个插件专门为了Typecho主题:【Brave—勇敢爱💕 】设计,支持SMTP、Send Cloud、阿里云邮件推送三种邮件通知方式。 在用户发布祝福时回复感谢,祝福审核通过后告知用户、还有用户忘记密码邮箱通知对不同场景进行对用户的不同邮件通知。作者:小周
插件效果 体验插件地址【点击跳转 】效果图:
用户发布祝福后收到的邮件效果图:
用户祝福审核通过后收到的邮件效果图:
用户祝福被回复后收到的邮件效果图:
用户登入页点击忘记后收到的邮件效果图:
安装方法
至LoveXXzhoudedi 中下载最新版本插件;
将下载的压缩包进行解压并上传至Typecho插件目录中,注意目录名称更改为LoveXXzhoudedi;
后台激活插件;
根据自己的实际情况选择邮件发送接口方式;
根据所选的邮件发送接口,配置相应接口参数。
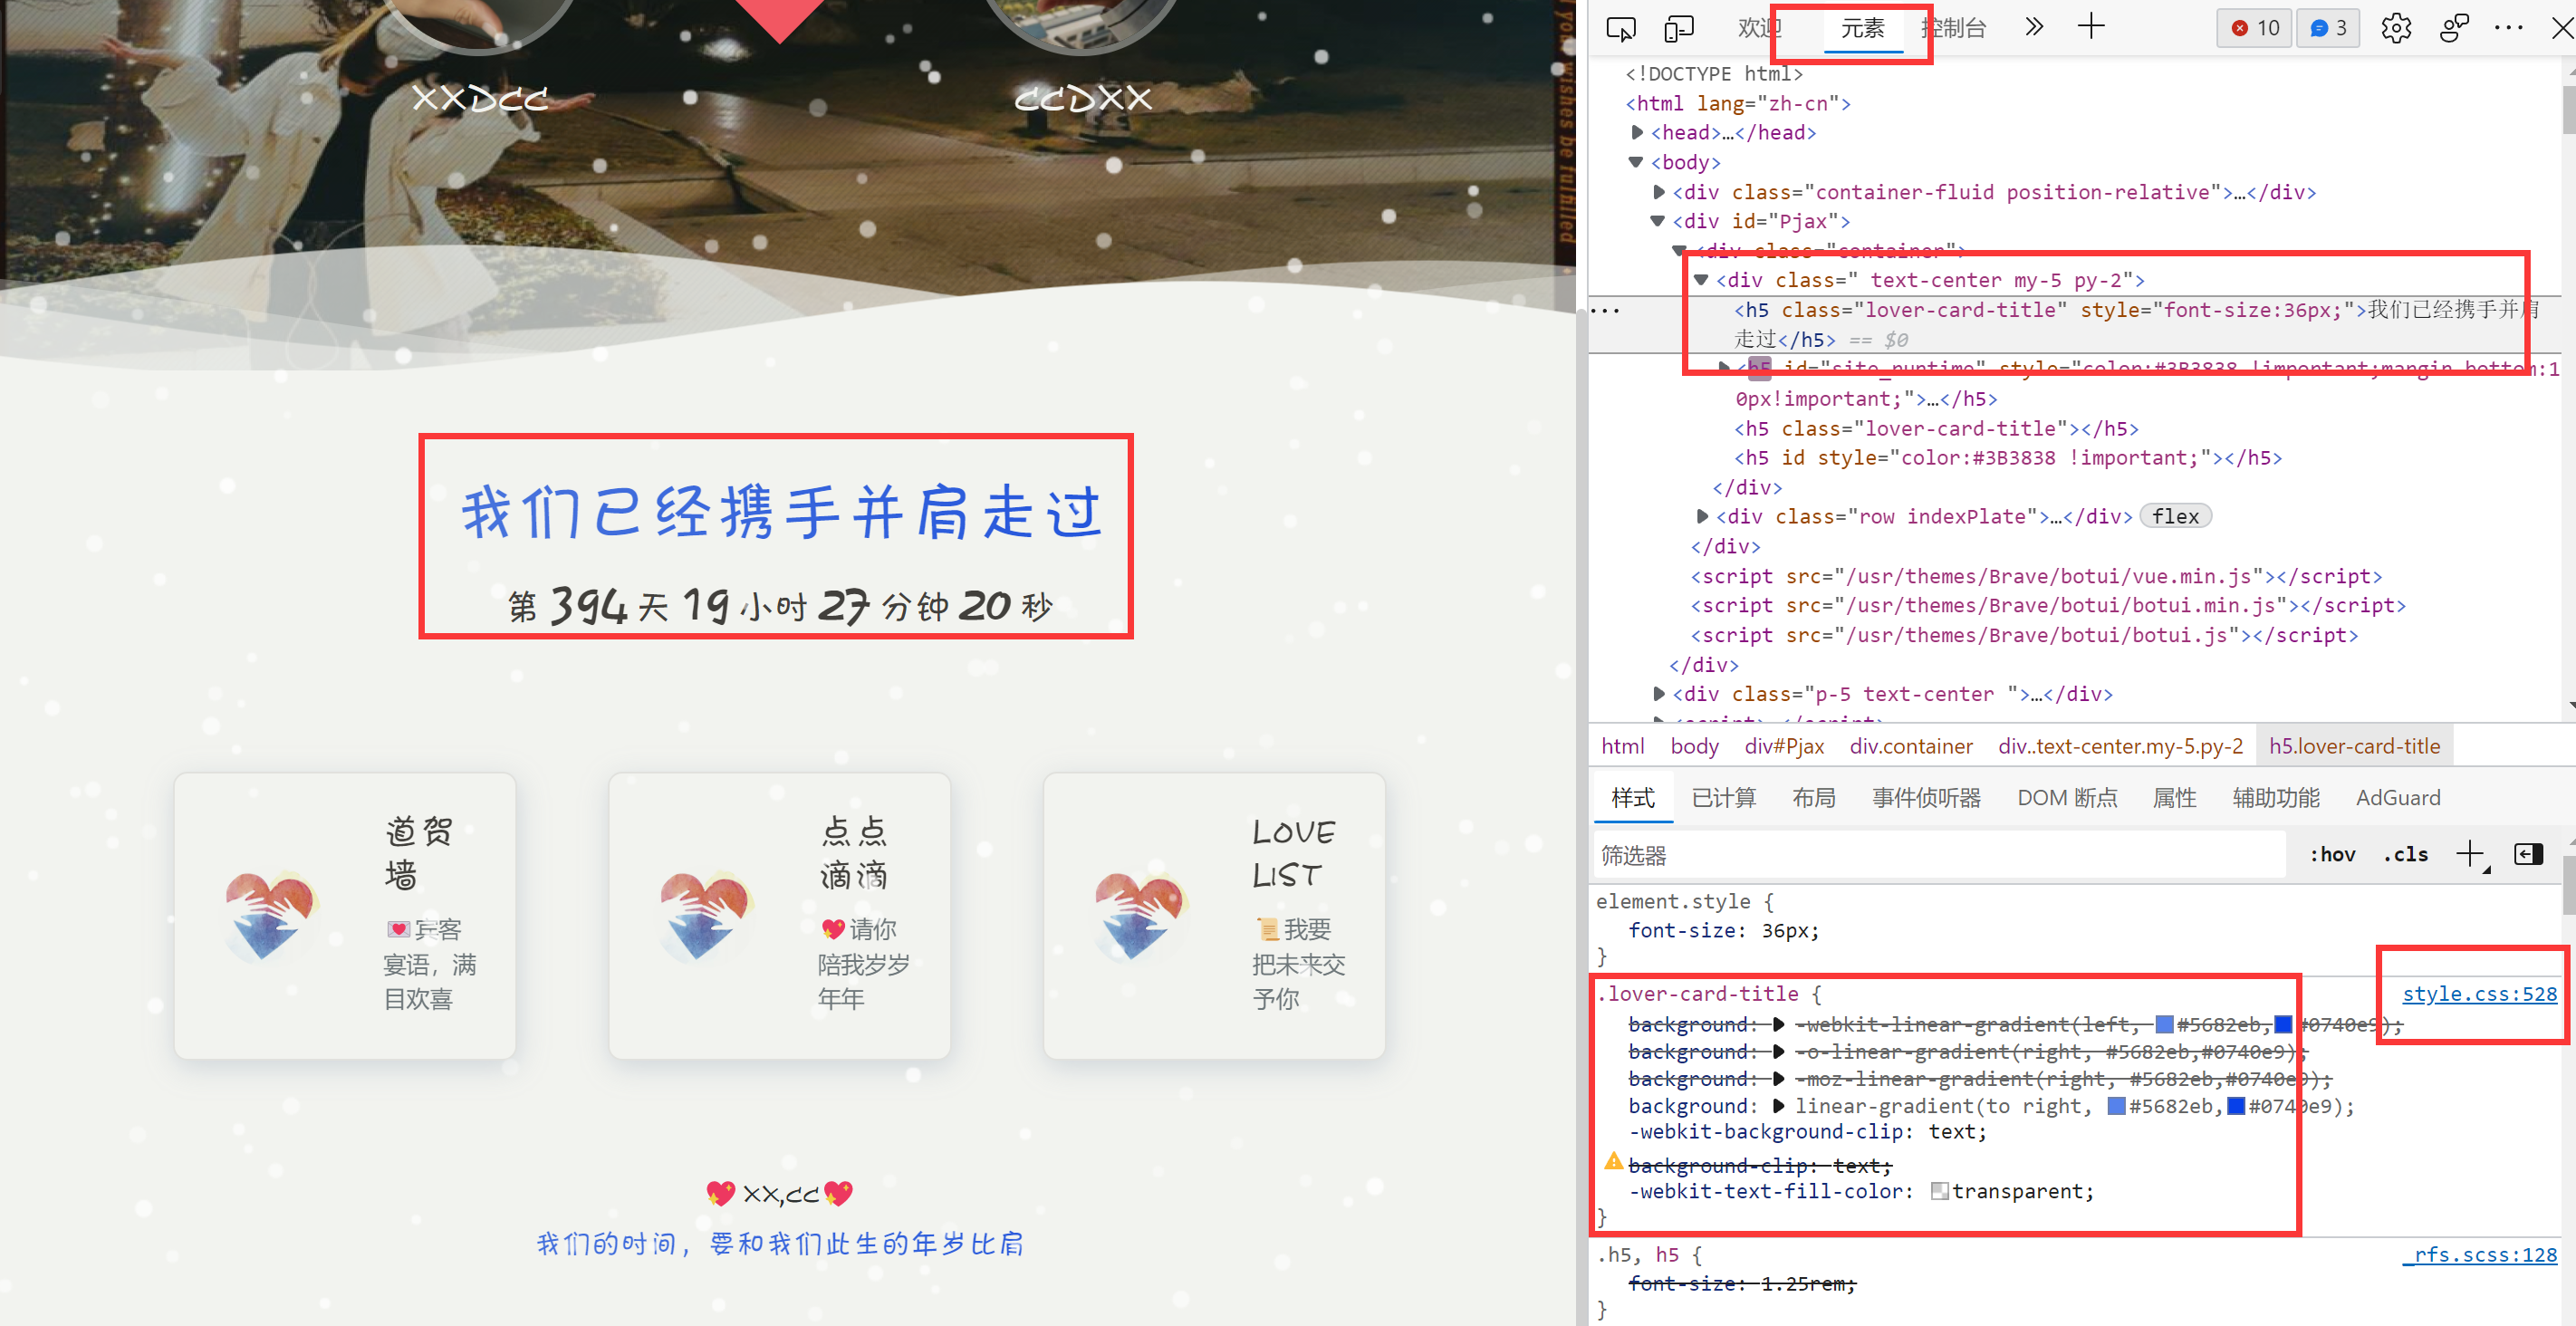
增加相识时间计时器 主题默认只有一套计时器,即设定相恋时间。如果想增加一套相识时间可以按照如下设置
加入计时器功能 打开footer.php,找到
1
2
3
4
5
6
7
8
<script> window.showSiteRuntime = function() { site_runtime = $("#site_runtime"); .... <?php if ($this->options->pjaxContent) : $this->options->pjax回调(); ?><?php endif; ?> NProgress.done(); }); </script>
在代码</script>之后加入
1
2
3
4
5
6
7
8
9
10
11
12
13
14
15
16
17
18
19
20
21
22
23
24
25
26
27
28
29
30
31
32
33
34
<script> window.showMeetRuntime = function() { meet_runtime = $("#meet_runtime"); if (!meet_runtime) { return; } window.setTimeout("showMeetRuntime()", 1000); start = new Date("<?php $this->options->meetingtime(); ?>"); now = new Date(); T = (now.getTime() - start.getTime()); i = 24 * 60 * 60 * 1000; d = T / i; D = Math.floor(d); h = (d - D) * 24; H = Math.floor(h); m = (h - H) * 60; M = Math.floor(m); s = (m - M) * 60 S = Math.floor(s); meet_runtime.html("第 <span class=\"bigfontNum\">" + D + "</span> 天 <span class=\"bigfontNum\">" + H + "</span> 小时 <span class=\"bigfontNum\">" + M + "</span> 分钟 <span class=\"bigfontNum\">" + S + "</span> 秒"); }; showMeetRuntime(); $(document).pjax('a', '#Pjax', { fragment: '#Pjax', timeout: 6000 }); $(document).on('pjax:send', function() { NProgress.start(); }); $(document).on('pjax:complete', function() { <?php if ($this->options->pjaxContent) : $this->options->pjax回调(); ?><?php endif; ?> NProgress.done(); }); </script>
将计时器引入网站首页 在网站根目录找到/usr/themes/Brave/indexPage.php双击打开编辑,在代码的13行到18行进行改动
1
2
3
4
5
6
<blockquote class="blockquote text-center my-5 py-2"> <h5 class="lover-card-title">今天是我们相识的</h5>/*相识的文字*/ <h5 id="meet_runtime"></h5>/*引入相识计时器*/ <h5 class="lover-card-title">也是我们在一起的</h5>/*相恋文字。原句是:我们风雨同舟已经一起走过,我这里做了修改*/ <h5 id="site_runtime"></h5>/*引入相恋计时器*/ </blockquote>
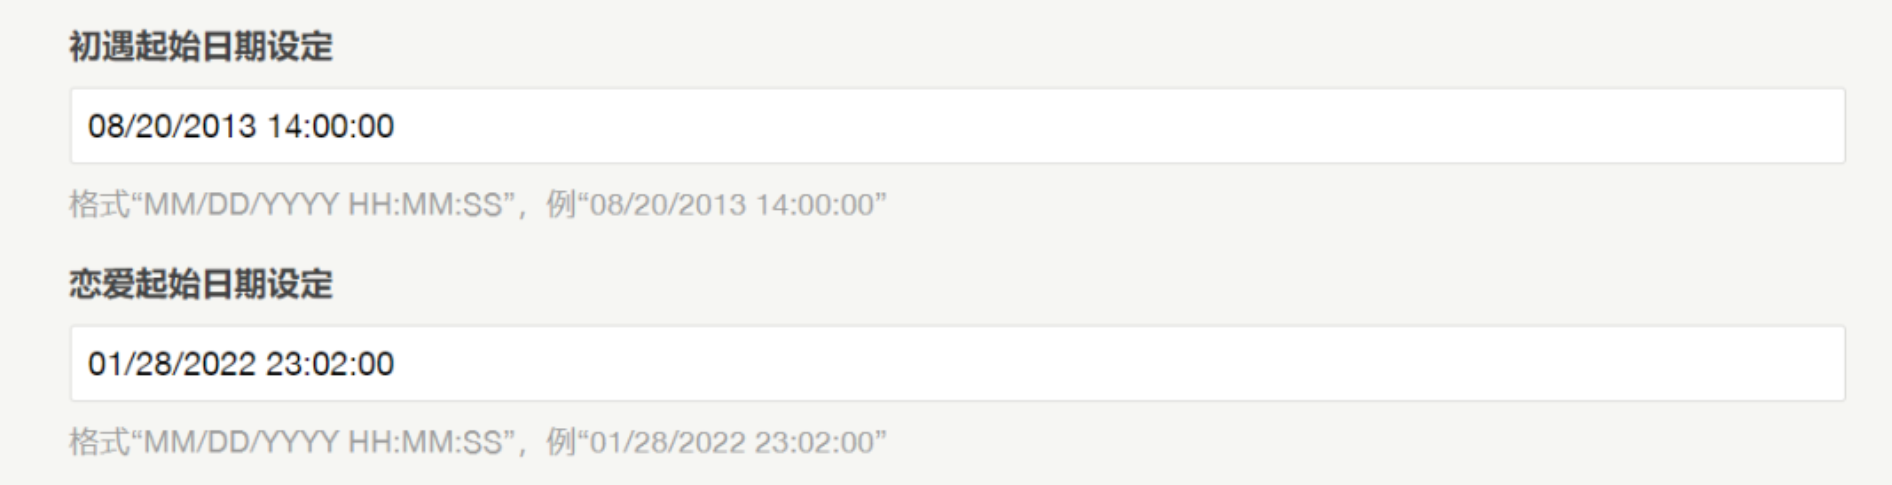
网站后台加入相识时间输入框 这里是为了方便与用户的交互,只要在后台的【设置外观】按格式填入相识时间即可
在网站根目录找到/usr/themes/Brave/function.php双击打开编辑,找到
1 $lovetime = new Typecho_Widget_Helper_Form_Element_Text('lovetime', NULL, NULL, _t('恋爱起始日期设定'), _t('格式“MM/DD/YYYY HH:MM:SS”,例“01/28/2022 23:02:00”'));
在前面加入
1
2
$meetingtime = new Typecho_Widget_Helper_Form_Element_Text('meetingtime', NULL, NULL, _t('初遇起始日期设定'), _t('格式“MM/DD/YYYY HH:MM:SS”,例“08/20/2013 14:00:00”')); $form->addInput($meetingtime);
回到后台的【设置外观】即可看到新增了初遇起始时间设定,时间格式参考下图
考虑到首页的计时器数字过大,可以在/usr/themes/Brave/base/style.css中找到第一个.bigfontNum{}将字体大小改为2rem
1
2
3
.bigfontNum{ font-size: 2rem; }
如果看不到效果的变化请清除浏览器的cookie后刷新网站页面,文字具体样式与颜色请参见前面的内容
插入音乐 有两种方式:一种是直接在网页下面添加背景音乐(只插入一首音乐),一种是在网站里加入一个音乐播放器(可以播放一个列表的音乐)
文章插入背景音乐
直接插入,直接在文章撰写时在想要插入音乐的地方嵌入网易云外链播放器的html代码
插件插入
这个需要安装一个meting插件,将插件上传至网站根目录/usr/plugins,在后台【控制台】【插件】中启用该插件,启用成功后可以进行相关设置。进入文章撰写页点击右上角的耳机图标,插入音乐链接即可在文章中插入音乐
下载地址:https://distance1998.lanzouw.com/iKHPIzr806b
官网及使用手册:https://github.com/MoePlayer/APlayer-Typecho
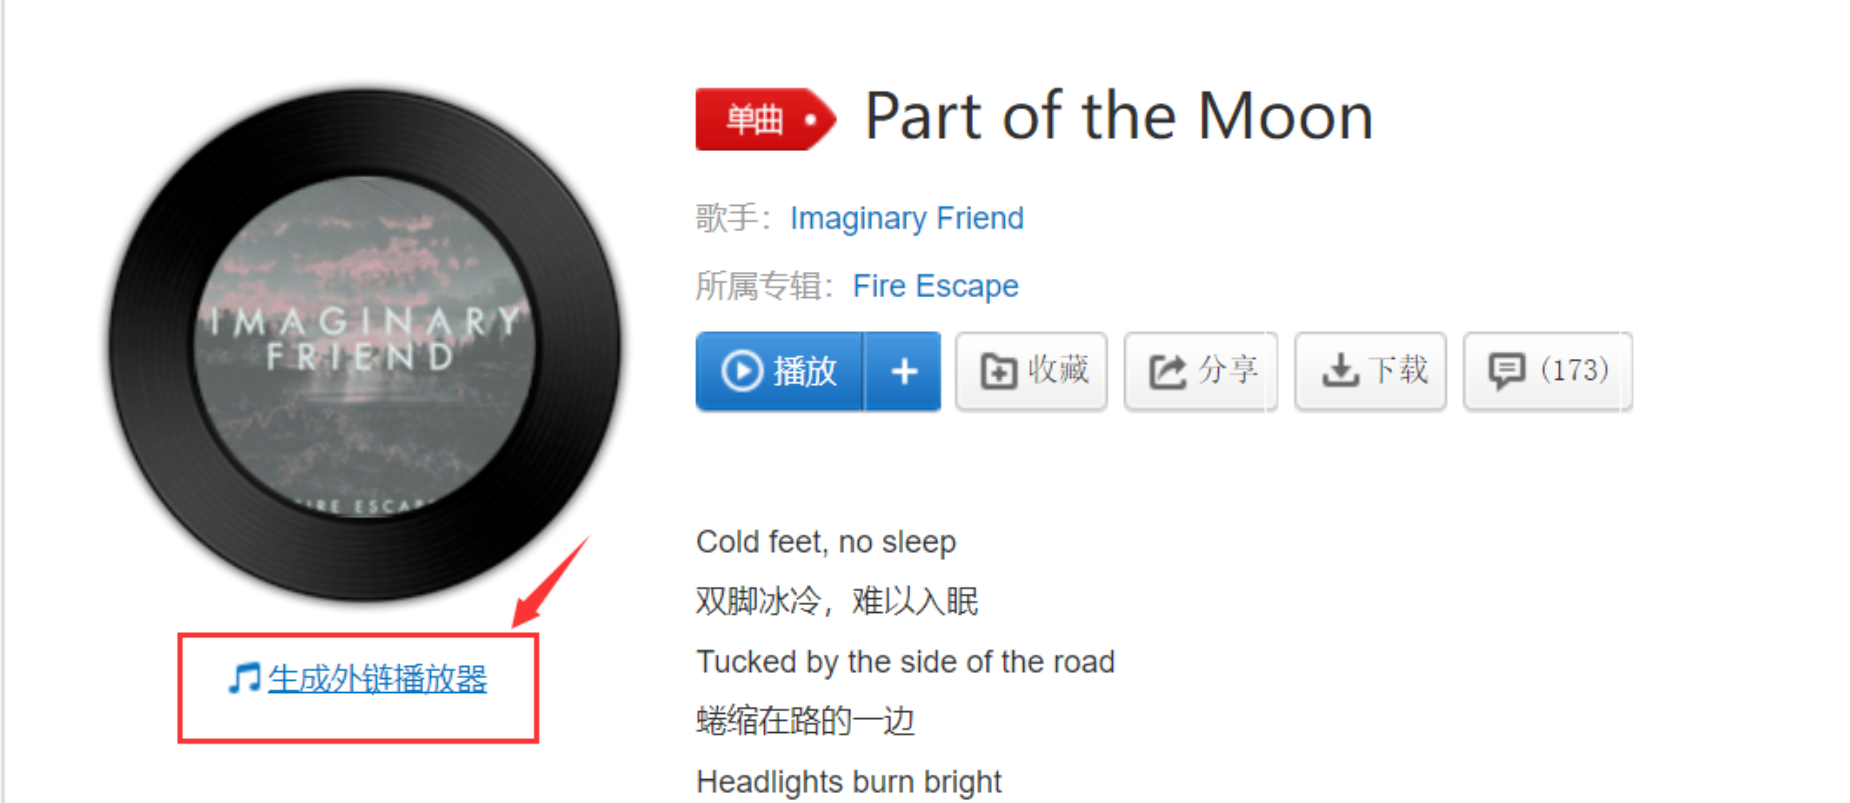
页面插入背景音乐 以网易云为例,网易云现在已经支持以外链的方式将网易云音乐插入网页中
浏览器登录网易云音乐
找到自己想插入的音乐,点击生成外链播放器
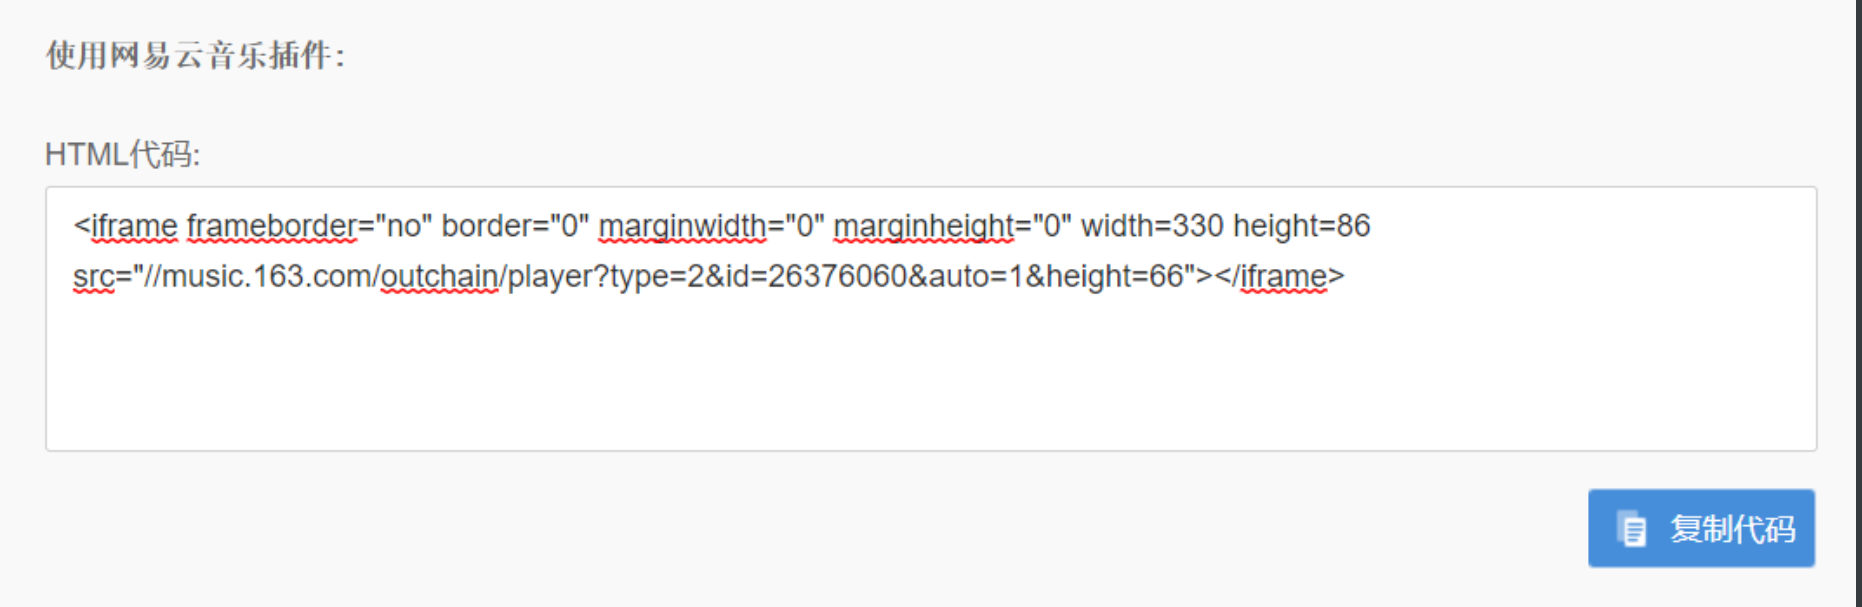
复制HTML代码到想插入的页面中
以插入到lovelist页面为例,找到并打开loveListPage.php,将以下的代码加入到<?php $this->need('base/footer.php'); ?>之前,保存
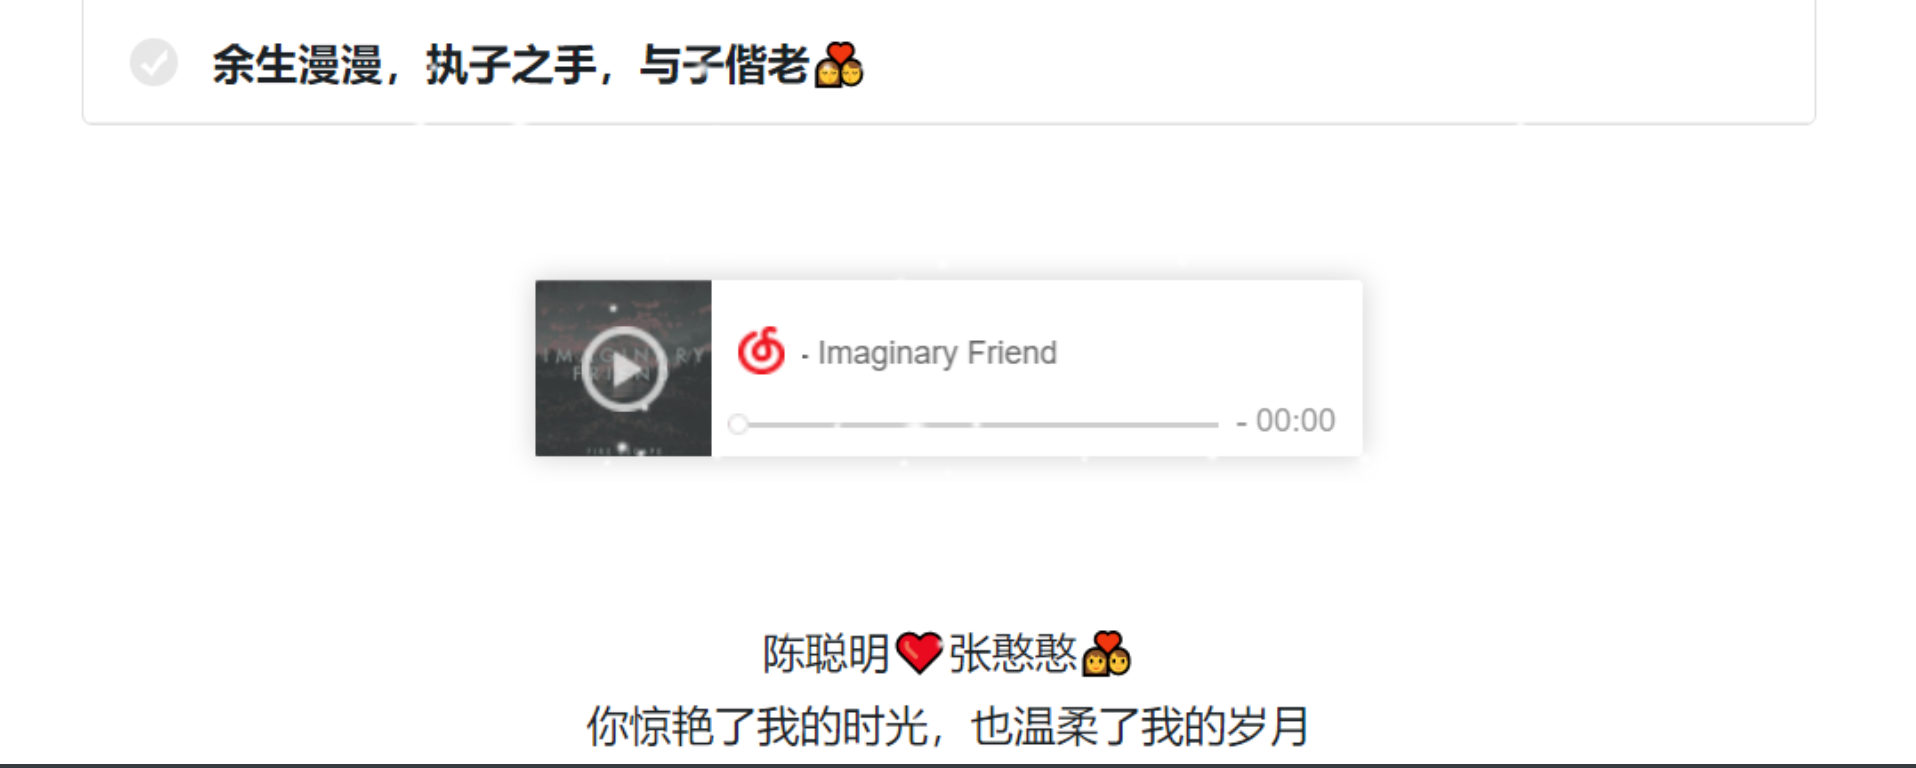
1
2
3
<div class="container text-center"> <iframe frameborder="no" border="0" marginwidth="0" marginheight="0" width=330 height=86 src="//music.163.com/outchain/player?type=2&id=26376060&auto=1&height=66"></iframe>/*此处插入前面复制的HTML代码*/ </div>
效果:
插入音乐播放器 我目前使用的是这一种方式在网站插入音乐,打开foot.php,在</body>前插入如下代码
1
2
3
4
5
6
7
8
9
10
11
<link rel="stylesheet" href="https://cdn.jsdelivr.net/npm/aplayer/dist/APlayer.min.css"> <script src="https://cdn.jsdelivr.net/npm/aplayer/dist/APlayer.min.js"></script> <script src="https://cdn.jsdelivr.net/npm/meting@2/dist/Meting.min.js"></script> <meting-js server="netease"/*插入网易云*/ type="playlist"/*c插入歌单*/ id=""/*插入歌单id*/ fixed="true"/*启用吸底模式*/ autoplay="true"/*自动播放,仅适用于手机浏览器,经测试PC端和微信打开自动播放均会被禁止*/ loop="all"/*循环播放*/ >
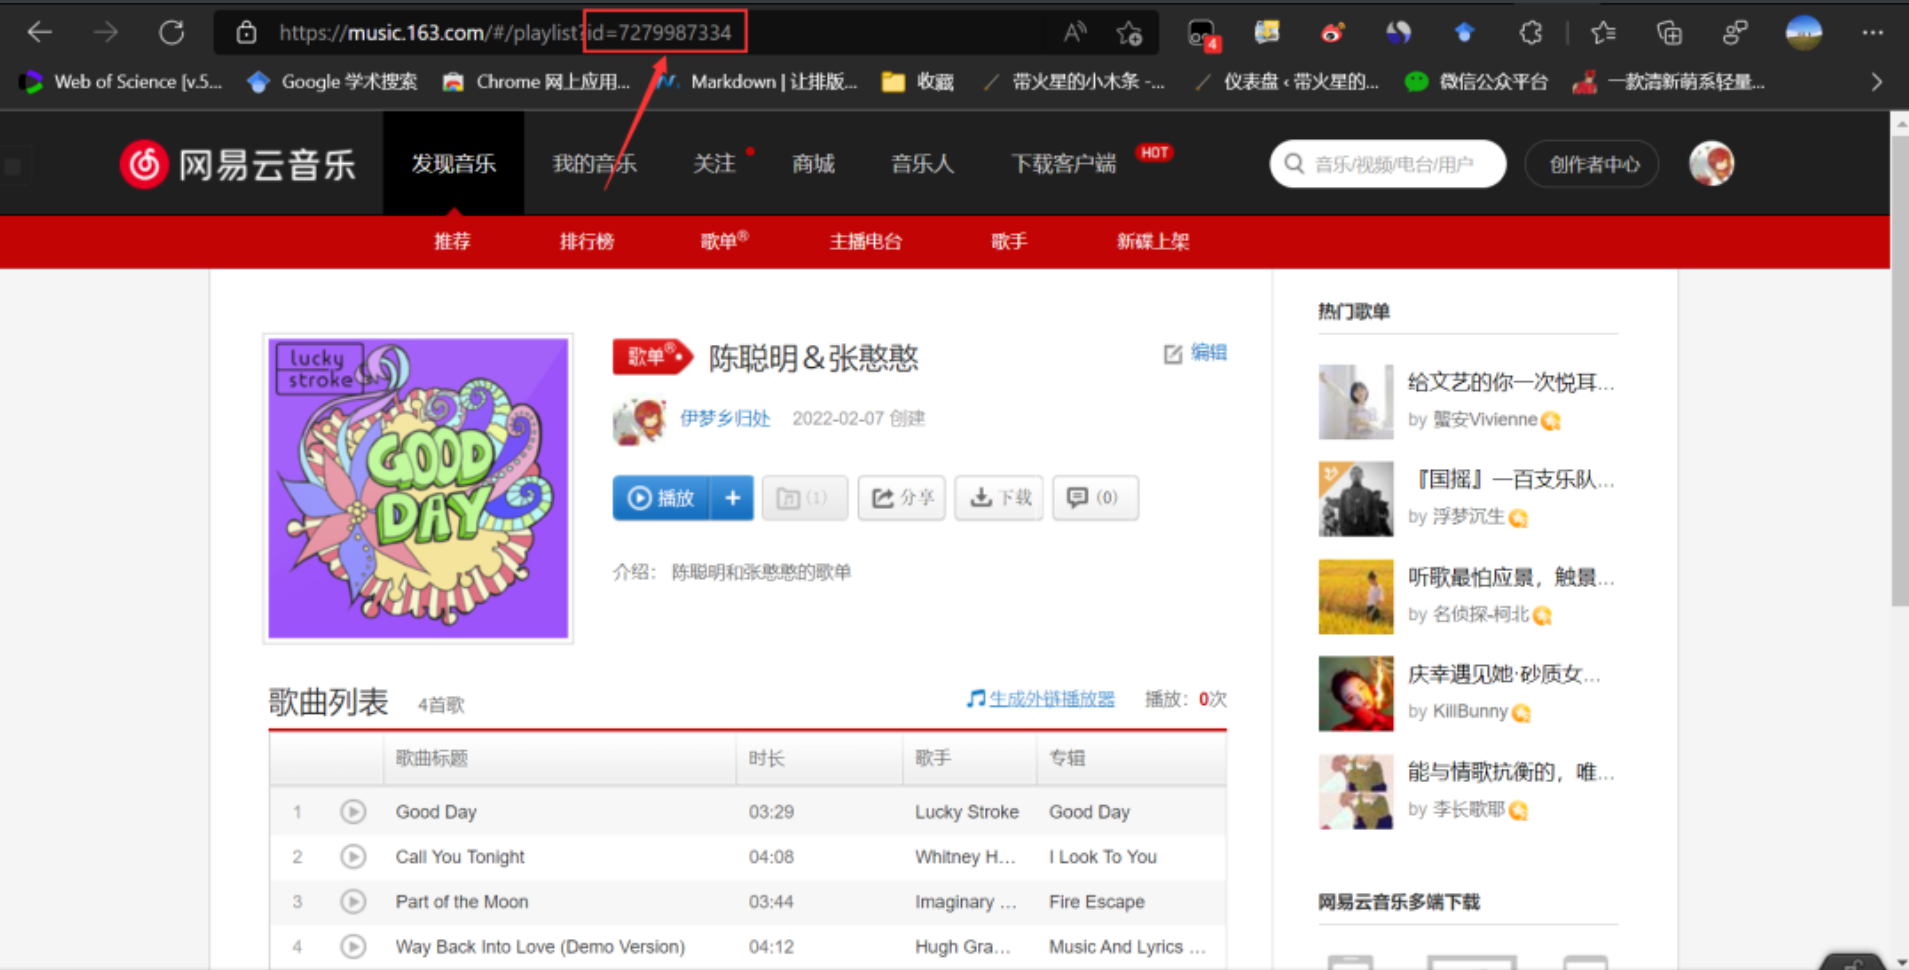
找到网易云歌单id的方法很简单,就是进入歌单主页在地址栏中找到id后面的数字,将数字填入到id="",恰好网易云有一个共享歌单的功能,邀请另一半一起管理歌单,歌单会实时同步到网站的音乐列表下
如果想插入其他音乐,或设置其他参数可参考官方手册:https://github.com/metowolf/MetingJS
注 :如果使用插入音乐播放器的方法就不要安装Meting插件了,两者会有冲突
加入鼠标点击特效 鼠标每点击网站页面一次,就会弹出一行文字
打开footer.php,在</body>前插入如下代码
1
2
3
4
5
6
7
8
9
10
11
12
13
14
15
16
17
18
19
20
21
22
23
24
25
26
27
28
29
30
31
32
33
34
35
36
37
38
39
40
41
42
43
<!--鼠标点击特效--> <script type="text/javascript"> jQuery(function () { $("html").click(function(e) { var a_idx = Math.floor((Math.random() * 30));/*鼠标点击随机出现一句话,代码数字请与添加的短句数量相一致*/ var a = new Array( "希望全世界停电 我可以偷偷跑去亲你", "我会爱你很久很久","我在贩卖日落 你像神明一样将阳光撒向我","陪伴本身就是这个世界上最了不起的安慰方式", "嘿,我是一朵云ლ(⁰⊖⁰ლ)", "❤" ,"陪你把岁月熬成清酒 陪你把孤夜熬成温柔","❤","月光下邂逅的是爱情和你","祝眉目舒展 顺问冬按","只想拥你入怀","这个世界乱糟糟的 而你干干净净","日月星辰之外 你是第四种难得","我会在每个有意义的时刻 远隔山海与你共存","山脚下遇见的你 我们山顶见","想试试在你迎面跑来一把抱住你的感觉","在生命里的旅程里 遇见你真好","如果不曾遇见 岂知生命如何","❤" ,"想和你一起走过下雪后的天","在我贫瘠的土地上你是最后的玫瑰","今晚月色很美呢","r=a(1-sinθ)","天青色等烟雨 而我在等你","你是我这一生等了半世未拆的礼物","你养我 我养你 两人爱情甜蜜蜜","人的一生会遇见两个人 一个惊艳了时光 一个温柔了岁月","你不用多好,我喜欢就好","愿有岁月可回首 且以深情共白头" );/*请在此添加句子*/ var color1 = Math.floor((Math.random() * 255)) var color2 = Math.floor((Math.random() * 255)); var color3 = Math.floor((Math.random() * 255)); var $i = $("<span />").text(a[a_idx]); var x = e.pageX, y = e.pageY; $i.css({ "z-index": 9999999999999 , "top": y - 20, "left": x, "position": "absolute", "font-family":"mmm", "fontSize":Math.floor((Math.random() * 5)+10),/*文字大小在10px到15px之间*/ "font-weight": "bold", "color": "rgb("+color1+","+color2+","+color3+")",/*随机颜色*/ "-webkit-user-select":"none", "-moz-user-select":"none", "-ms-user-select":"none", "user-select":"none", }); $("body").append($i); $i.animate({ "top": y - 200, "opacity": 0 }, 3000,/*句子悬浮时间*/ function() { $i.remove(); }); }); }); </script>
为网站添加灯笼 过年的时候为了增加喜庆可以为网站顶部添加灯笼
打开footer.php,在</body>前插入如下代码[5]
1
2
3
4
5
6
7
8
9
10
11
12
13
14
15
16
17
18
19
20
21
22
23
24
25
26
27
28
29
30
31
32
33
34
35
36
37
38
39
40
41
42
43
44
45
46
47
48
49
50
51
52
53
54
55
56
57
58
59
60
61
62
63
64
65
66
67
68
69
70
71
72
73
74
75
76
77
78
79
80
81
82
83
84
85
86
87
88
89
90
91
92
93
94
95
96
97
98
99
100
101
102
103
104
105
106
107
108
109
110
111
112
113
114
115
116
117
118
119
120
121
122
123
124
125
126
127
128
129
130
131
132
133
134
135
136
137
138
139
140
141
142
143
144
145
146
147
148
149
150
151
152
153
154
155
156
157
158
159
160
161
162
163
164
165
166
167
168
169
170
171
172
173
174
175
176
177
178
179
180
181
182
183
184
185
186
187
188
189
190
191
192
193
194
195
196
197
198
199
200
201
202
203
204
205
206
207
208
209
210
211
212
213
214
215
216
217
218
219
220
221
222
223
224
<!--灯笼--> <div class="deng-box2"> <div class="deng"> <div class="xian"></div> <div class="deng-a"> <div class="deng-b"> <div class="deng-t">年</div> </div> </div> <div class="shui shui-a"> <div class="shui-c"></div> <div class="shui-b"></div> </div> </div> </div> <div class="deng-box3"> <div class="deng"> <div class="xian"></div> <div class="deng-a"> <div class="deng-b"> <div class="deng-t">新</div> </div> </div> <div class="shui shui-a"> <div class="shui-c"></div> <div class="shui-b"></div> </div> </div> </div> <div class="deng-box1"> <div class="deng"> <div class="xian"></div> <div class="deng-a"> <div class="deng-b"> <div class="deng-t">乐</div> </div> </div> <div class="shui shui-a"> <div class="shui-c"></div> <div class="shui-b"></div> </div> </div> </div> <div class="deng-box"> <div class="deng"> <div class="xian"></div> <div class="deng-a"> <div class="deng-b"> <div class="deng-t">快</div> </div> </div> <div class="shui shui-a"> <div class="shui-c"></div> <div class="shui-b"></div> </div> </div> </div> <style type="text/css">.deng-box { position: fixed; top: -40px; right: -20px; z-index: 9999; pointer-events: none } .deng-box1 { position: fixed; top: -30px; right: 10px; z-index: 9999; pointer-events: none } .deng-box2 { position: fixed; top: -40px; left: -20px; z-index: 9999; pointer-events: none } .deng-box3 { position: fixed; top: -30px; left: 10px; z-index: 9999; pointer-events: none } .deng-box1 .deng, .deng-box3 .deng { position: relative; width: 120px; height: 90px; margin: 50px; background: #d8000f; background: rgba(216, 0, 15, .8); border-radius: 50% 50%; -webkit-transform-origin: 50% -100px; -webkit-animation: swing 5s infinite ease-in-out; box-shadow: -5px 5px 30px 4px #fc903d } .deng { position: relative; width: 120px; height: 90px; margin: 50px; background: #d8000f; background: rgba(216, 0, 15, .8); border-radius: 50% 50%; -webkit-transform-origin: 50% -100px; -webkit-animation: swing 3s infinite ease-in-out; box-shadow: -5px 5px 50px 4px #fa6c00 } .deng-a { width: 100px; height: 90px; background: #d8000f; background: rgba(216, 0, 15, .1); margin: 12px 8px 8px 8px; border-radius: 50% 50%; border: 2px solid #dc8f03 } .deng-b { width: 45px; height: 90px; background: #d8000f; background: rgba(216, 0, 15, .1); margin: -4px 8px 8px 26px; border-radius: 50% 50%; border: 2px solid #dc8f03 } .xian { position: absolute; top: -20px; left: 60px; width: 2px; height: 20px; background: #dc8f03 } .shui-a { position: relative; width: 5px; height: 20px; margin: -5px 0 0 59px; -webkit-animation: swing 4s infinite ease-in-out; -webkit-transform-origin: 50% -45px; background: orange; border-radius: 0 0 5px 5px } .shui-b { position: absolute; top: 14px; left: -2px; width: 10px; height: 10px; background: #dc8f03; border-radius: 50% } .shui-c { position: absolute; top: 18px; left: -2px; width: 10px; height: 35px; background: orange; border-radius: 0 0 0 5px } .deng:before { position: absolute; top: -7px; left: 29px; height: 12px; width: 60px; content: " "; display: block; z-index: 999; border-radius: 5px 5px 0 0; border: solid 1px #dc8f03; background: orange; background: linear-gradient(to right, #dc8f03, orange, #dc8f03, orange, #dc8f03) } .deng:after { position: absolute; bottom: -7px; left: 10px; height: 12px; width: 60px; content: " "; display: block; margin-left: 20px; border-radius: 0 0 5px 5px; border: solid 1px #dc8f03; background: orange; background: linear-gradient(to right, #dc8f03, orange, #dc8f03, orange, #dc8f03) } .deng-t { font-family: 华文行楷, Arial, Lucida Grande, Tahoma, sans-serif; font-size: 3.2rem; color: #dc8f03; font-weight: 700; line-height: 85px; text-align: center } .night .deng-box, .night .deng-box1, .night .deng-t { background: 0 0 !important } @-moz-keyframes swing { 0% { -moz-transform: rotate(-10deg) } 50% { -moz-transform: rotate(10deg) } 100% { -moz-transform: rotate(-10deg) } } @-webkit-keyframes swing { 0% { -webkit-transform: rotate(-10deg) } 50% { -webkit-transform: rotate(10deg) } 100% { -webkit-transform: rotate(-10deg) } }</style>
添加botui聊天机器人
BotUI框架作为一款自动回复文字、图片、视频的JS聊天机器人,可以自由设置多种选项、触发关键词、输入框等内容,聊天内容或范围也可以自由设置,回复内容可以是文字、图片(GIF亦可)、视频。
botui可以帮助我们与网站访客进行简单地交互,比如用来自我介绍。
接下来演示一下怎么在Brave主题中加入这个聊天机器人。
首先在botui官网:https://github.com/botui/botui 下载必要组件的压缩包并完成解压,下载vue.min.js : https://distance1998.lanzouw.com/iAWaazth3uj并解压。登录宝塔面板,在/usr/themes/Brave目录下新建一个botui文件夹,将botui官网下载的build文件夹下的botui-theme-default.css、botui.min.css、botui.min.js及下载的vue.min.js一并上传至刚刚在宝塔面板新建的botui文件夹。
引入CSS样式文件 在head部分引入botui-theme-default.css、botui.min.css。打开网站后台,进入设置外观界面,找到头部自定义内容 将下面代码填入到头部自定义内容输入框中
1
2
<link rel="stylesheet" href="/usr/themes/Brave/botui/botui.min.css" /> <link rel="stylesheet" href="/usr/themes/Brave/botui/botui-theme-default.css" />
创建聊天机器人 在body部分添加机器人,引入botui.min.js、vue.min.js及交互内容js文件。其中交互内容js文件可以自己命名也可以直接命名为botui.js以下均以botui.js为例,在添加好交互内容后将botui.js上传到/usr/themes/Brave/botui文件夹下。
交互内容如何写请查看官方文档:https://docs.botui.org/。
给个小例子,你可以直接将以下代码粘贴到botui.js空文件中
1
2
3
4
5
6
7
8
9
10
11
12
13
14
15
16
17
18
19
20
21
22
23
24
25
26
27
28
29
30
31
32
33
34
35
36
37
38
39
40
41
42
43
44
45
46
47
48
49
50
51
var botui = new BotUI("botui"); botui.message.bot({ delay: 200, content: "hi,欢迎来到这里😄" }).then(function() { return botui.message.bot({ delay: 1000, content: "我是聊天机器人" }) }).then(function() { return botui.message.bot({ delay: 1000, content: "你想知道什么吗?" }) }).then(function() { return botui.action.button({ delay: 1500, action: [{ text: "你来自哪里", value: "lz" }, { text: "不感兴趣", value: "bgxq" }] }) }).then(function(res) { if (res.value == "lz") { lz() } if (res.value == "bgxq") { bgxq() } }); var lz = function() { botui.message.bot({ delay: 1500, content: "我来自虚拟的网络" }).then(function() { return botui.message.bot({ delay: 1500, content: "是个可爱的机器人😃" }) }) } var bgxq = function() { botui.message.bot({ delay: 1500, content: "再见" }) }
文章页面引入聊天机器人 这个比较简单,假设以上均设置好后,新建一篇文章,将以下代码粘贴到文章中(框架未美化),发布后就可以看到聊天机器人与访客的交互效果了。
1
2
3
4
5
<div class="botui-app-container" id="botui"><!-- id要与交互内容第一行的var botui = new BotUI("此处填一个id值")相同; --> <bot-ui></bot-ui> <script src="/usr/themes/Brave/botui/vue.min.js"></script> <script src="/usr/themes/Brave/botui/botui.min.js"></script> <script src="/usr/themes/Brave/botui/botui.js"></script>
网站首页添加聊天机器人 在Brave主题网站里,文章发布后要进入点点滴滴页面才能查看。而我想做一个在网站首页就可以查看的聊天机器人,通过聊天机器人来交互式地介绍这个网站。
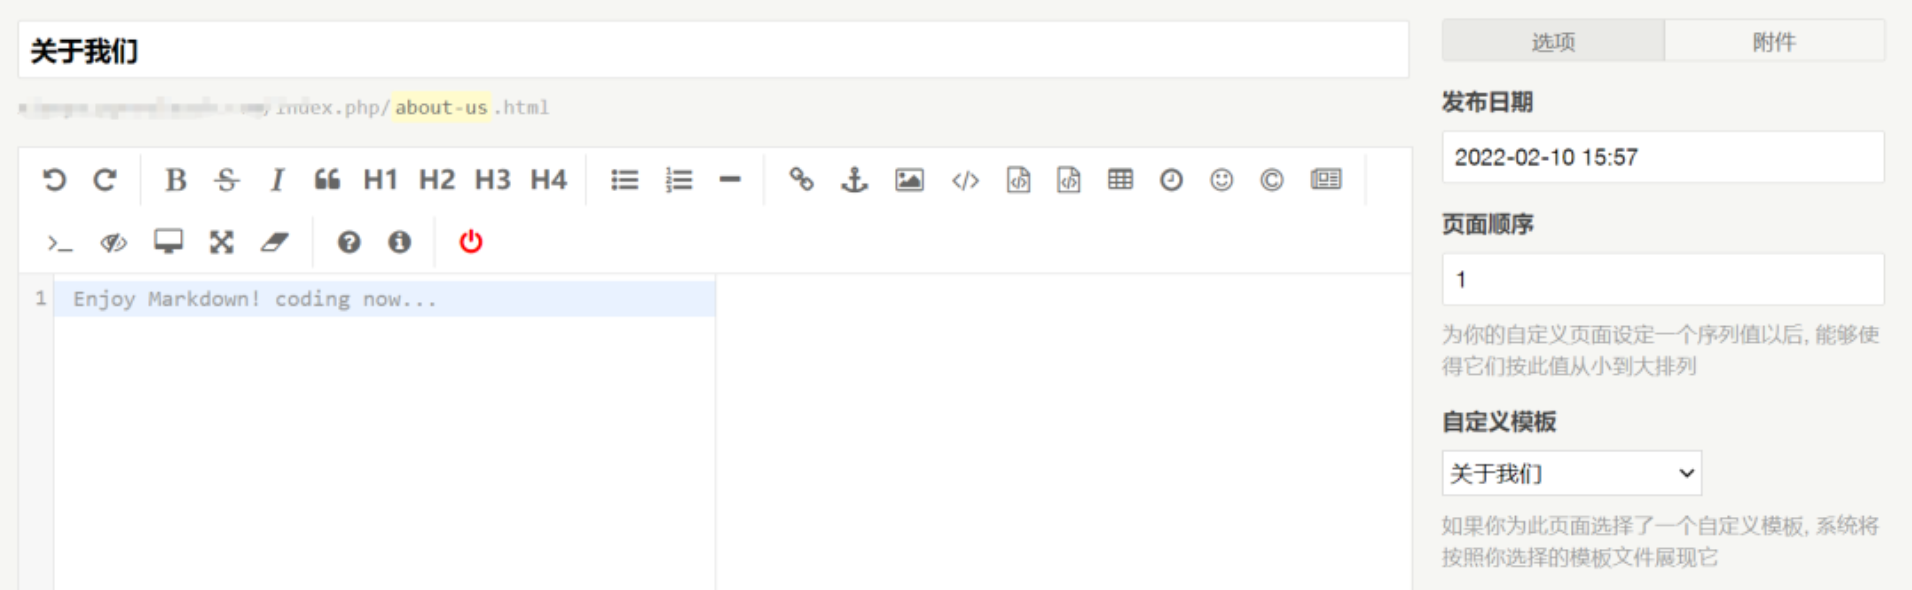
方法是创建一个关于我们 的模板文件,再创建一个新的页面选择这个模板页,最后将页面显示在网站首页。
1.创建模板 创建一个about-us.php的空文件,将下面代码粘贴到这个文件中。将about-us.php通过宝塔面板上传到根目录下的/usr/themes/Brave文件夹下
1
2
3
4
5
6
7
8
9
10
11
12
13
14
15
16
17
18
19
20
21
22
23
24
25
26
27
28
29
30
31
32
<?php /** * 关于我们 * @package custom * Author: ace * CreateTime: 2022/02/10 * about-us page */ $this->need('base/head.php'); $this->need('base/nav.php');?> <div class="list-content mx-auto mt-5"> <div class="list-top"> <h5 class="list-text">💕关于我们💕</h5> </div> </div> <div class="botui-app-container" id="botui" style="min-height:300px; padding:14px 6px 4px 6px; background-image:url(https://s2.loli.net/2022/02/10/htvkG9LmSJWK4CF.jpg); border-radius: 10px;"> <h6 class="list-text" style="color:#F2F2F2;"><strong>与<?php $this->options->title() ?>对话中...</strong></h6> <bot-ui style="background:transparent;"> <center> <h4 style="color:#F2F2F2;">Loading...</h4> <h5 style="color:#F2F2F2;padding-top:30px;">请刷新一次页面以使聊天机器人能正常显示</h5> </center> <bot-ui> </div> <script src="/usr/themes/Brave/botui/vue.min.js"></script> <script src="/usr/themes/Brave/botui/botui.min.js"></script> <script src="/usr/themes/Brave/botui/botui.js"></script> <?php $this->need('base/footer.php'); ?>
2.创建新的独立页 登录网站后台,选择创建页面,在自定义模板中选择关于我们 模板,标题任意填写,链接可以填写about-us。最后点击发布页面
3.设置关于我们页面显示在网站首页 找到并打开/usr/themes/Brave/functions.php,将以下代码填入到functions.php中保存,最好靠近lovelist和祝福板表单。
1
2
3
4
$aboutPageIcon = new Typecho_Widget_Helper_Form_Element_Text('aboutPageIcon', NULL, NULL, _t('首页关于页面图标'), _t('在此输入图标直链,将显示在首页关于小版块中')); $form->addInput($aboutPageIcon); $aboutPageLink = new Typecho_Widget_Helper_Form_Element_Text('aboutPageLink', NULL, NULL, _t('关于页面链接'), _t('在此输入关于页面链接')); $form->addInput($aboutPageLink);
在网站后台的设置外观填入图标链接和前面创建页面的链接,链接前要加http(s)://
找到并打开/usr/themes/Brave/indexPage.php,将以下代码填入<div class="row indexPlate">下方并保存,代码中的文字可任意修改
1
2
3
4
5
6
7
8
9
10
11
12
13
14
15
16
17
<div class="col-md-4"> <a href="<?php $this->options->aboutPageLink() ?>" class="card "> <div class="card-body"> <div class="row align-items-center"> <div class="col-auto"> <div class="avatar avatar-md"> <img src="<?php $this->options->aboutPageIcon() ?>" alt="..." class="avatar-img rounded-circle"> </div> </div> <div class="col"> <p class="h5">关于我们</p> <p class="small text-muted mb-1">💑我们的经历</p> </div> </div> </div> </a> </div>
回到网站就可以发现关于我们页面已经出现在网站首页
点击关于我们 进入交互聊天机器人页面,效果如下:
如果你的效果与我的不一样或者想让手机端有个更好的显示效果,请打开/usr/themes/Brave/botui/botui.min.css将以下代码替换11行的.botui-app-container选择器
1 .botui-app-container{width:90%;height:100%;line-height:1;margin:0 auto}@media (min-width:600px){.botui-app-container{width:600px;height:500px;margin:0 auto}}
注 :目前基于页面的聊天机器人可能会出现加载不出的情况,这是由于该主题具有pjax无刷新加载网页的功能,关于页面中的js文件无法被网页加载,解决办法就是刷新一次关于页面。基于文章的聊天机器人则不会出现这种情况。
为网站添加相册 如果一个网站没有相册功能那也太不完美了,Brave主题本着简洁不自带相册功能。那么如何给Brave主题添加相册呢?
通过搜索找到了一个基于typecho的相册单页面模板,该模板来自:https://github.com/zzd/photo-page-for-typecho,感谢作者的开源。作者提供了两种相册模板:Multiverse和lens。Multiverse demo:https://html5up.net/uploads/demos/multiverse/ Lens demo:https://html5up.net/uploads/demos/lens/
在GitHub上下载模板文件后,将其中的Multiverse.php、Lens.php、Multiverse文件夹及Lens文件夹上传到/usr/themes/Brave文件夹下。以Multiverse相册风格为例进行创建相册演示
创建相册页面 登录网站后台,选择创建页面,在自定义模板中选择Multiverse风格照片集 模板,标题填写相册,链接可以填写album。最后点击发布页面
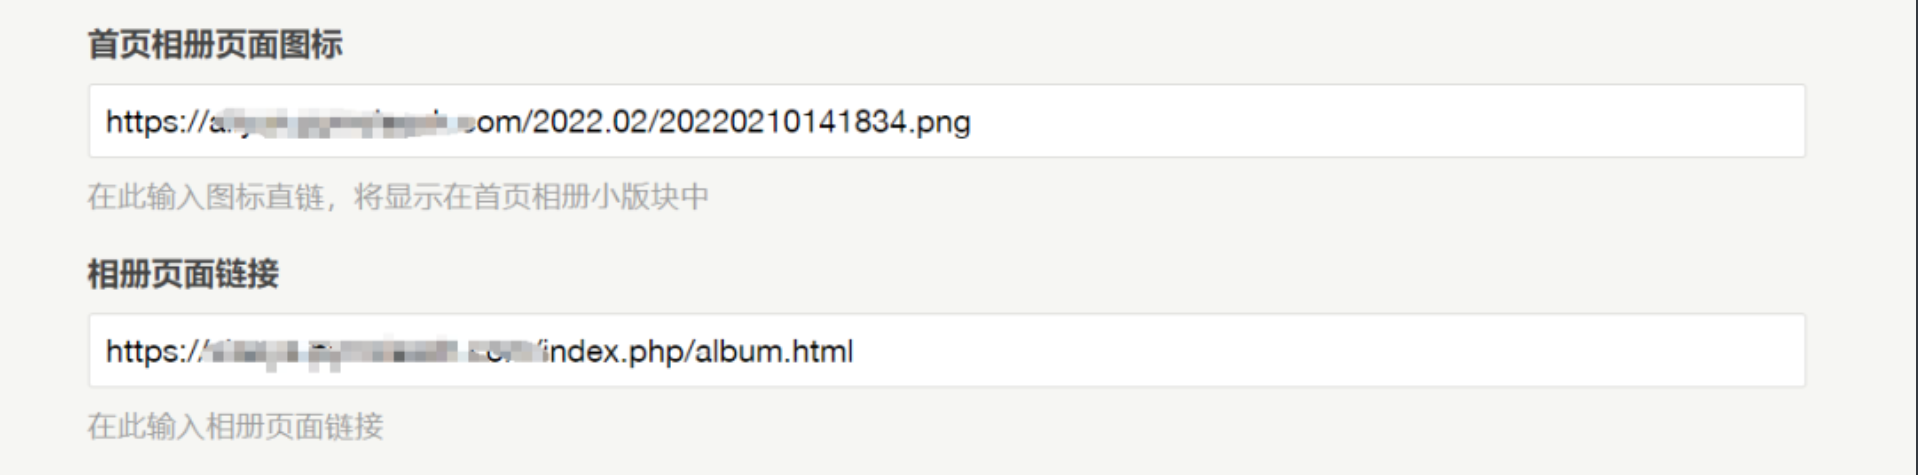
设置相册页面显示在网站首页 与创建关于我们页面相同 ,将以下代码填入到functions.php中保存
1
2
3
4
$albumPageIcon = new Typecho_Widget_Helper_Form_Element_Text('albumPageIcon', NULL, NULL, _t('首页相册页面图标'), _t('在此输入图标直链,将显示在首页相册小版块中')); $form->addInput($albumPageIcon); $albumPageLink = new Typecho_Widget_Helper_Form_Element_Text('albumPageLink', NULL, NULL, _t('相册页面链接'), _t('在此输入相册页面链接')); $form->addInput($albumPageLink);
在网站后台的设置外观填入图标链接和前面创建相册页面的链接,链接前要加http(s)://
将以下代码填入indexPage.php合适的位置并保存,代码中的文字可任意修改
1
2
3
4
5
6
7
8
9
10
11
12
13
14
15
16
17
<div class="col-md-4"> <a href="<?php $this->options->albumPageLink() ?>" class="card "> <div class="card-body"> <div class="row align-items-center"> <div class="col-auto"> <div class="avatar avatar-md"> <img src="<?php $this->options->albumPageIcon() ?>" alt="..." class="avatar-img rounded-circle"> </div> </div> <div class="col"> <p class="h5">相册</p> <p class="small text-muted mb-1">🖼️留住你我回忆</p> </div> </div> </div> </a> </div>
回到网站可以发现相册页面已经出现在网站首页
发布照片到相册 方法是打开前面创建的相册页面,在页面中填入照片标题,拍摄时间,照片的链接 分隔的逗号为英文逗号。也可以不填标题时间,但照片的链接前一定要有,,。更多使用说明请查看作者的readme文件。
添加时光记(说说页面) 时光记页面其实就是将祝福板的模板复制一份更改名称就成了时光机(说说)模板。
“只要我们不停地在此记录,它就会成为我们记忆的载体犹如一台时光机,在这个时光机页面可以一览我们过去的种种心情与回忆。”
时光机在主题作者祝福版的选择逻辑上就行修改,即如果 你是管理员则可以留下纪念,否则 作为访客只能观看。
下面简单说一下怎么做一个时光机页面。主要分两步:
创建时光机模板
注册时光机页面
创建时光机模板 时光机页面的样式本质上使用的是祝福板的样式,如果你不想在 style.css 做修改,则可以直接按照默认时光机进行设置。如果你想时光机样式好看点则按照美化后的时光机进行设置。两者二选一
默认时光机 在宝塔面板网站根目录/usr/themes/Brave文件夹下新建一个空白的timemachine.php文件,将以下代码复制到timemachine.php文件中
1
2
3
4
5
6
7
8
9
10
11
12
13
14
15
16
17
18
19
20
21
22
23
24
25
26
27
28
29
30
31
32
33
34
35
36
37
38
39
40
41
42
43
44
45
46
47
48
49
50
51
52
53
54
55
56
57
58
59
60
61
62
63
64
65
66
67
68
69
70
71
72
73
74
75
76
77
78
<?php /** * 时光机 * @package custom * Author: Veen Zhao & pyrroleach * CreateTime: 2022/2/24 12:54 */ $this->need('base/head.php'); $this->need('base/nav.php'); $this->comments()->to($comments); ?> <?php function threadedComments($comments, $options) { $commentClass = ''; if ($comments->authorId) { if ($comments->authorId == $comments->ownerId) { $commentClass .= ' comment-by-author'; } else { $commentClass .= ' comment-by-user'; } } $commentLevelClass = $comments->levels > 0 ? ' comment-child' : ' comment-parent'; ?> <div id="li-<?php $comments->theId(); ?>" class=" comment-body<?php if ($comments->levels > 0) { echo ' comment-child'; $comments->levelsAlt(' comment-level-odd', ' comment-level-even'); } else { echo ' comment-parent'; } $comments->alt(' comment-odd', ' comment-even'); echo $commentClass; ?>"> <div class="commentlist"> <div class="comment" id="li-<?php $comments->theId(); ?>"> <div id="<?php $comments->theId(); ?>"> <div class="comment-avatar"><img alt="" src="<?= App::avatarQQ($comments->mail); ?>s=100" class="avatar avatar-96 photo" height="96" width="96" style="display: inline;"></div> <div class="comment-body"> <div class="comment_author"> <span class="name"><?php $comments->author(); ?></span> <em><?php $comments->date('Y-m-d H:i'); ?></em> </div> <div class="comment-text"> <?php $comments->content(); ?> </div> </div> </div> </div> </div> <?php } ?> <?php if ($this->allow('comment')) : ?> <div id="<?php $this->respondId(); ?>" class="respond list-content mx-auto mt-5"> <div class="list-top"> <?php if ($comments->have()) : ?> <h5 class="text-center" ><?php $this->commentsNum(_t('暂无说说'), _t('仅有一条说说'), _t('累计发布了<span class="bigfontNum"> %d </span>条说说')); ?></h5> <?php $comments->listComments(); ?> <?php $comments->pageNav('« 前一页', '后一页 »'); ?> <?php endif; ?> <form method="post" action="<?php $this->commentUrl() ?>" name="comment-form" id="comment-form" role="form" class="comment-form"> <!--<?php if ($this->user->hasLogin()) : ?>--> <p><?php _e('登录身份: '); ?><a href="<?php $this->options->profileUrl(); ?>"><?php $this->user->screenName(); ?></a>. <a href="<?php $this->options->logoutUrl(); ?>" title="Logout"><?php _e('退出'); ?> »</a> </p> <div class="form-group"> <textarea rows="3" cols="50" name="text" id="textarea" class="form-control" style="background-image:none;"placeholder="<?php _e('青春岁月里,满满都是你'); ?>" required><?php $this->remember('text'); ?></textarea> </div> <div class="form-group" style="margin-bottom:35px;"> <button type="submit" class="float-right btn btn-outline-danger" ><?php _e('发布说说'); ?></button> </div> <!--<?php endif; ?>--> </form> </div> </div> <?php else : ?> <h3><?php _e('评论已关闭'); ?></h3> <?php endif; ?> <?php $this->need('base/footer.php'); ?>
然后保存,在网站后台中新建一个独立页面,模板选择时光机 ,标题为时光机 ,链接空白处填写 **timemachine**,发布页面。
到此时光机模板的创建就算完成了,如果你在后面的时光机页面注册也完成后你的时光机页面样式就是单调的样子,并不美观。
美化后的时光机 如果你想与我的时光机页面样式一样,请做以下修改:
查看上文祝福板页面的美化 ,按照教程走一遍
在宝塔面板网站根目录/usr/themes/Brave文件夹下新建一个空白的timemachine.php文件,将以下代码复制到timemachine.php文件中
1
2
3
4
5
6
7
8
9
10
11
12
13
14
15
16
17
18
19
20
21
22
23
24
25
26
27
28
29
30
31
32
33
34
35
36
37
38
39
40
41
42
43
44
45
46
47
48
49
50
51
52
53
54
55
56
57
58
59
60
61
62
63
64
65
66
67
68
69
70
71
72
73
74
75
76
77
78
<?php /** * 时光机 * @package custom * Author: Veen Zhao * CreateTime: 2020/9/6 15:38 */ $this->need('base/head.php'); // $this->need('base/nav.php'); $this->comments()->to($comments); ?> <?php function threadedComments($comments, $options) { $commentClass = ''; if ($comments->authorId) { if ($comments->authorId == $comments->ownerId) { $commentClass .= ' comment-by-author'; } else { $commentClass .= ' comment-by-user'; } } $commentLevelClass = $comments->levels > 0 ? ' comment-child' : ' comment-parent'; ?> <div id="li-<?php $comments->theId(); ?>" class=" comment-body<?php if ($comments->levels > 0) { echo ' comment-child'; $comments->levelsAlt(' comment-level-odd', ' comment-level-even'); } else { echo ' comment-parent'; } $comments->alt(' comment-odd', ' comment-even'); echo $commentClass; ?>"> <div class="commentlist"> <div class="comment" id="li-<?php $comments->theId(); ?>"> <div id="<?php $comments->theId(); ?>"> <div class="comment-avatar"><img alt="" src="<?= App::avatarQQ($comments->mail); ?>s=100" class="avatar avatar-96 photo" height="96" width="96" style="display: inline;"></div> <div class="comment-body"> <div class="comment_author"> <span class="name"><?php $comments->author(); ?></span> <em><?php $comments->date('Y-m-d | H:i'); ?></em> </div> <div class="comment-text"> <?php $comments->content(); ?> </div> </div> </div> </div> </div> <?php } ?> <?php if ($this->allow('comment')) : ?> <div id="<?php $this->respondId(); ?>" class="respond list-content mx-auto mt-5"> <div class="list-top"> <?php if ($comments->have()) : ?> <h5 class="loveList-title" style="display:block;text-align:center;margin-bottom:30px;"><a href="<?php Helper::options()->siteUrl() ?>"><?php $this->commentsNum(_t('暂无说说'), _t('仅有一条说说'), _t('累计发布了<span class="bigfontNum"> %d </span>条说说')); ?></a></h5> <?php $comments->listComments(); ?> <?php $comments->pageNav('« 前一页', '后一页 »'); ?> <?php endif; ?> <form method="post" action="<?php $this->commentUrl() ?>" name="comment-form" id="comment-form" role="form" class="comment-form"> <!--<?php if ($this->user->hasLogin()) : ?>--> <p><?php _e('登录身份: '); ?><a href="<?php $this->options->profileUrl(); ?>"><?php $this->user->screenName(); ?></a>. <a href="<?php $this->options->logoutUrl(); ?>" title="Logout"><?php _e('退出'); ?> »</a> </p> <div class="form-group"> <textarea rows="3" cols="50" name="text" id="textarea" class="form-control" style="background-image:none;"placeholder="<?php _e('青春岁月里,满满都是你'); ?>" required><?php $this->remember('text'); ?></textarea> </div> <div class="form-group" style="margin-bottom:35px;"> <button type="submit" class="float-right btn btn-outline-danger" ><?php _e('发布说说'); ?></button> </div> <!--<?php endif; ?>--> </form> </div> </div> <?php else : ?> <h3><?php _e('评论已关闭'); ?></h3> <?php endif; ?> <?php $this->need('base/footer.php'); ?>
然后保存,在网站后台中新建一个独立页面,模板选择时光机 ,标题为时光机 ,链接空白处填写 **timemachine**,发布页面。
注 :我取消了时光机页面的头部部分,把返回主页的链接放到了页面标题:累计发布了xx条说说,点击此标题即可返回网站主页。如果你还想显示头部部分,可以取消注释// $this->need('base/nav.php');
注册时光机页面 找到并打开/usr/themes/Brave/functions.php,将以下代码填入到functions.php中保存,最好靠近如祝福板表单。
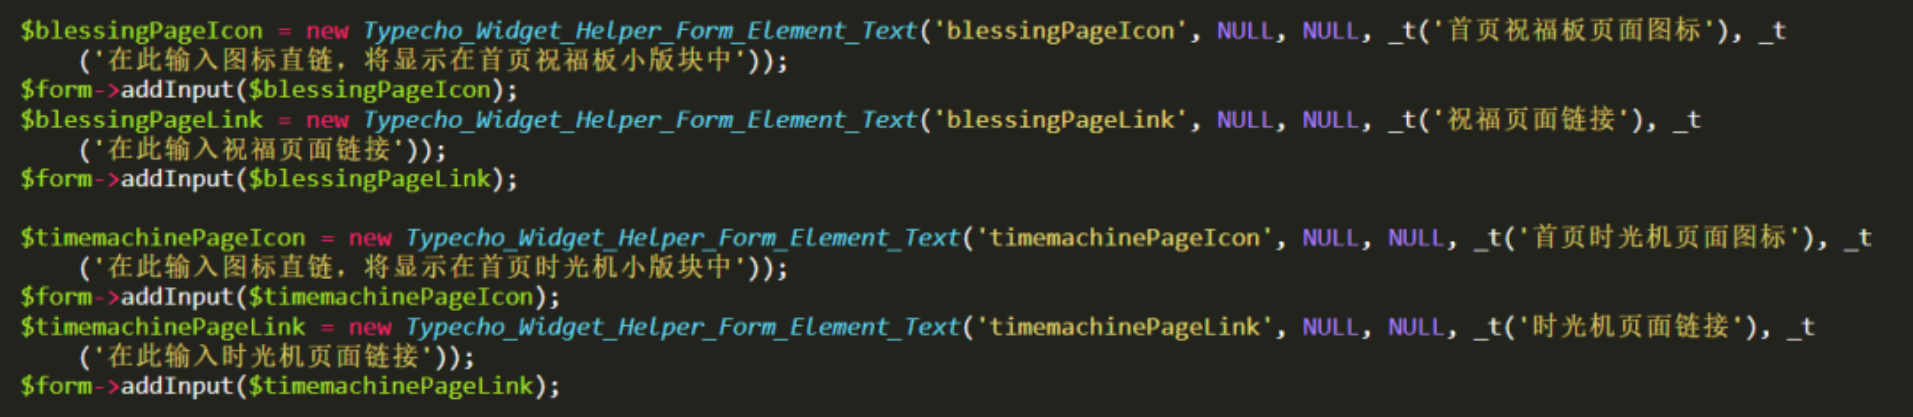
1
2
3
4
$timemachinePageIcon = new Typecho_Widget_Helper_Form_Element_Text('timemachinePageIcon', NULL, NULL, _t('首页时光机页面图标'), _t('在此输入图标直链,将显示在首页时光机小版块中')); $form->addInput($timemachinePageIcon); $timemachinePageLink = new Typecho_Widget_Helper_Form_Element_Text('timemachinePageLink', NULL, NULL, _t('时光机页面链接'), _t('在此输入时光机页面链接')); $form->addInput($timemachinePageLink);
在网站后台的设置外观填入图标链接和前面创建时光机页面的链接,链接前要加http(s)://
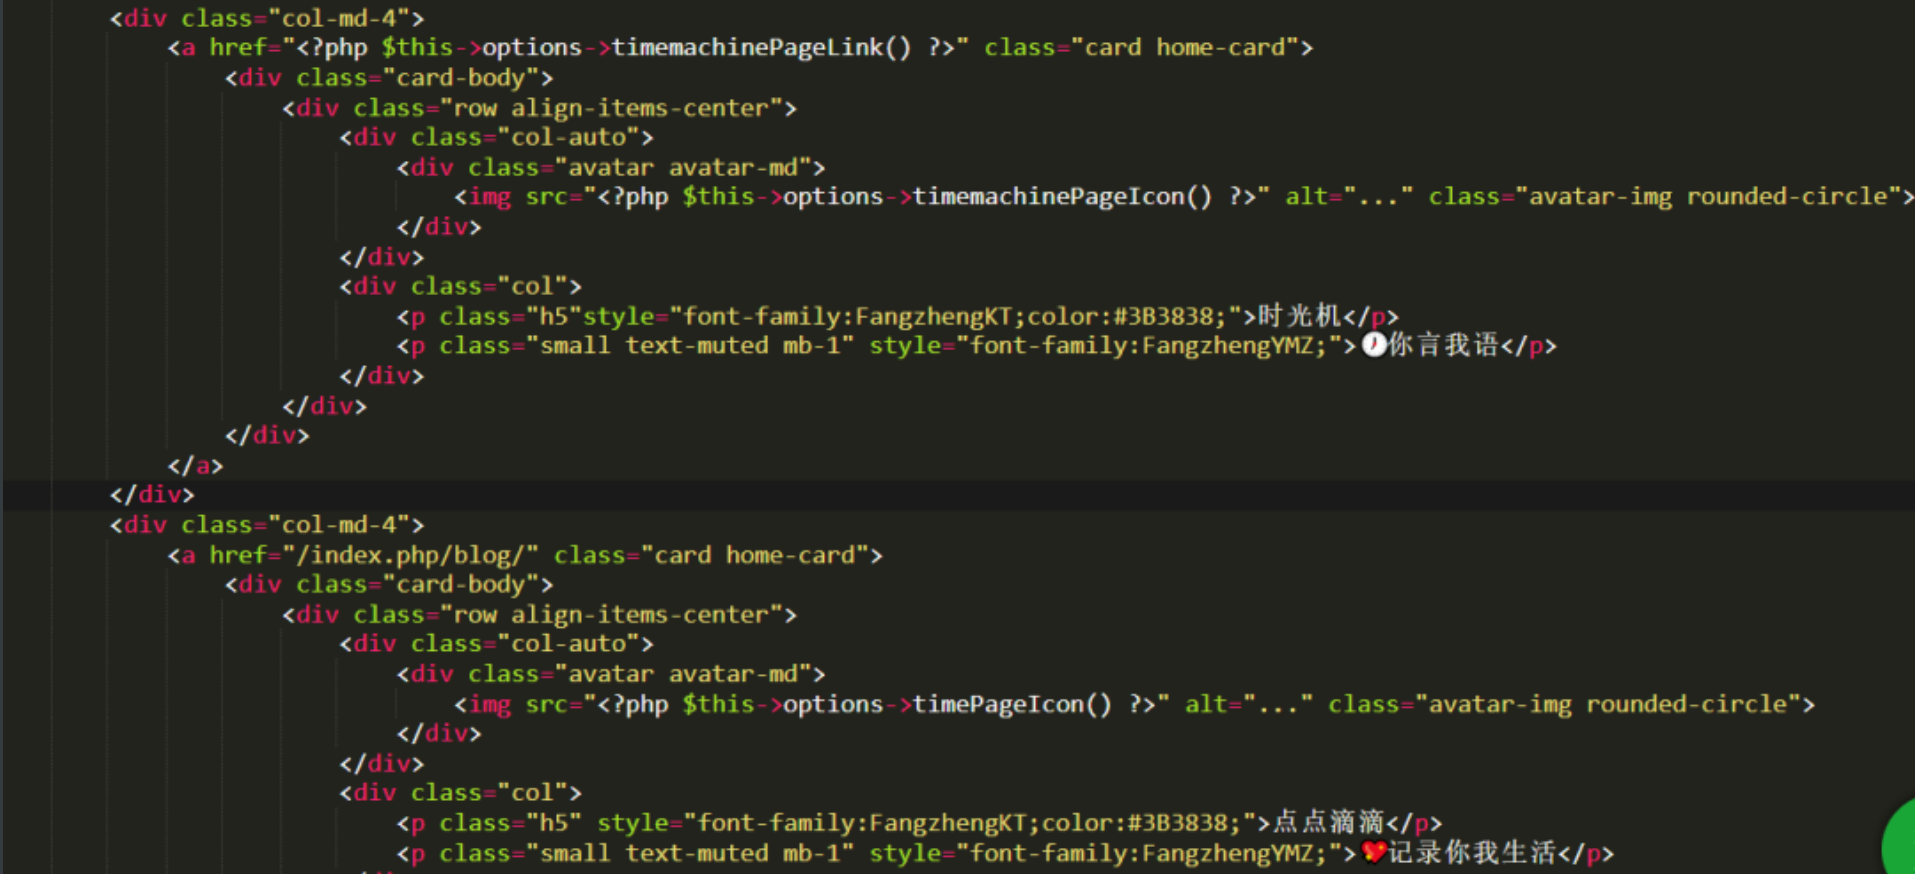
首页显示 找到并打开/usr/themes/Brave/indexPage.php,将以下代码填入<div class="row indexPlate">下方并保存,代码中的文字可任意修改,该代码放置顺序决定其在网站主页的显示顺序
1
2
3
4
5
6
7
8
9
10
11
12
13
14
15
16
17
<div class="col-md-4"> <a href="<?php $this->options->timemachinePageLink() ?>" class="card home-card"> <div class="card-body"> <div class="row align-items-center"> <div class="col-auto"> <div class="avatar avatar-md"> <img src="<?php $this->options->timemachinePageIcon() ?>" alt="..." class="avatar-img rounded-circle"> </div> </div> <div class="col"> <p class="h5"style="font-family:FangzhengKT;color:#3B3838;">时光机</p> <p class="small text-muted mb-1" >🕖你言我语</p> </div> </div> </div> </a> </div>
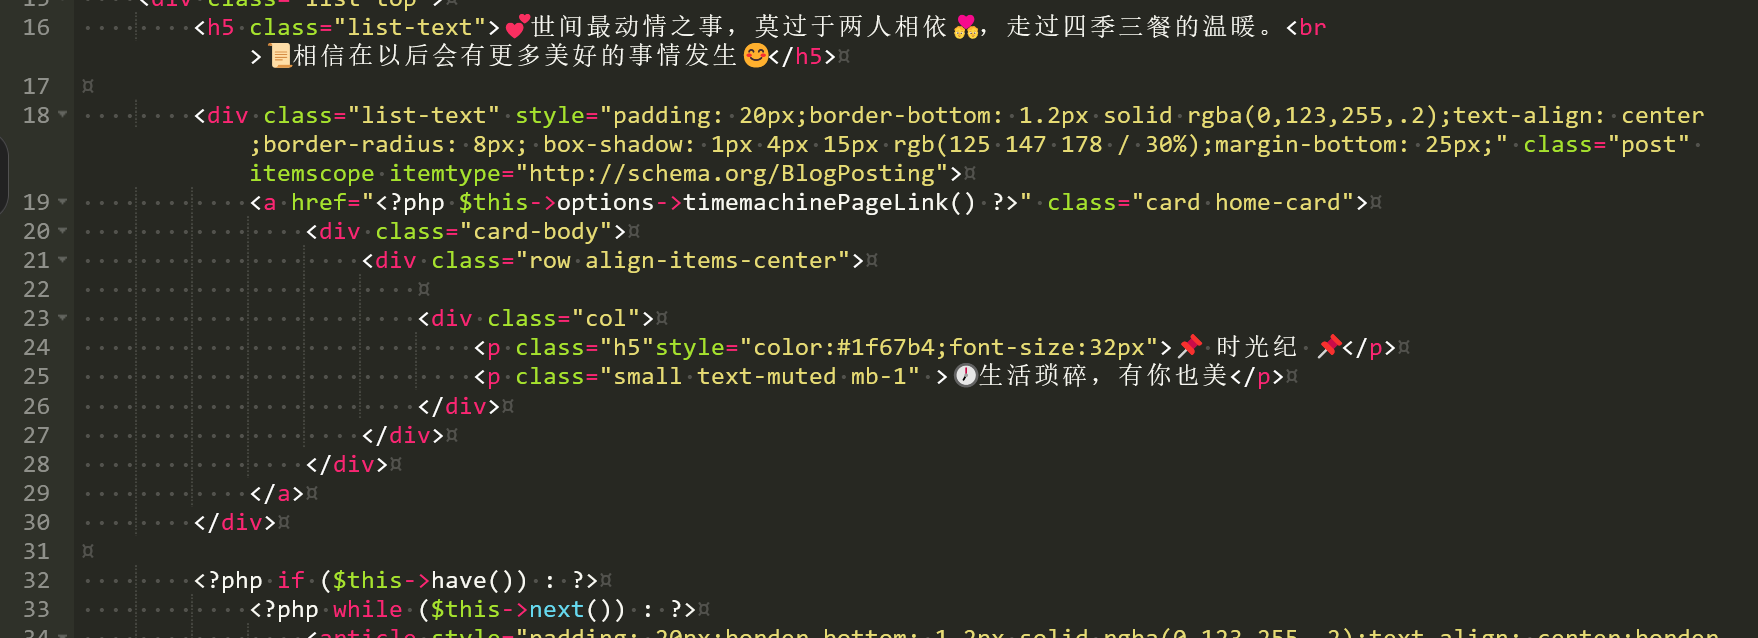
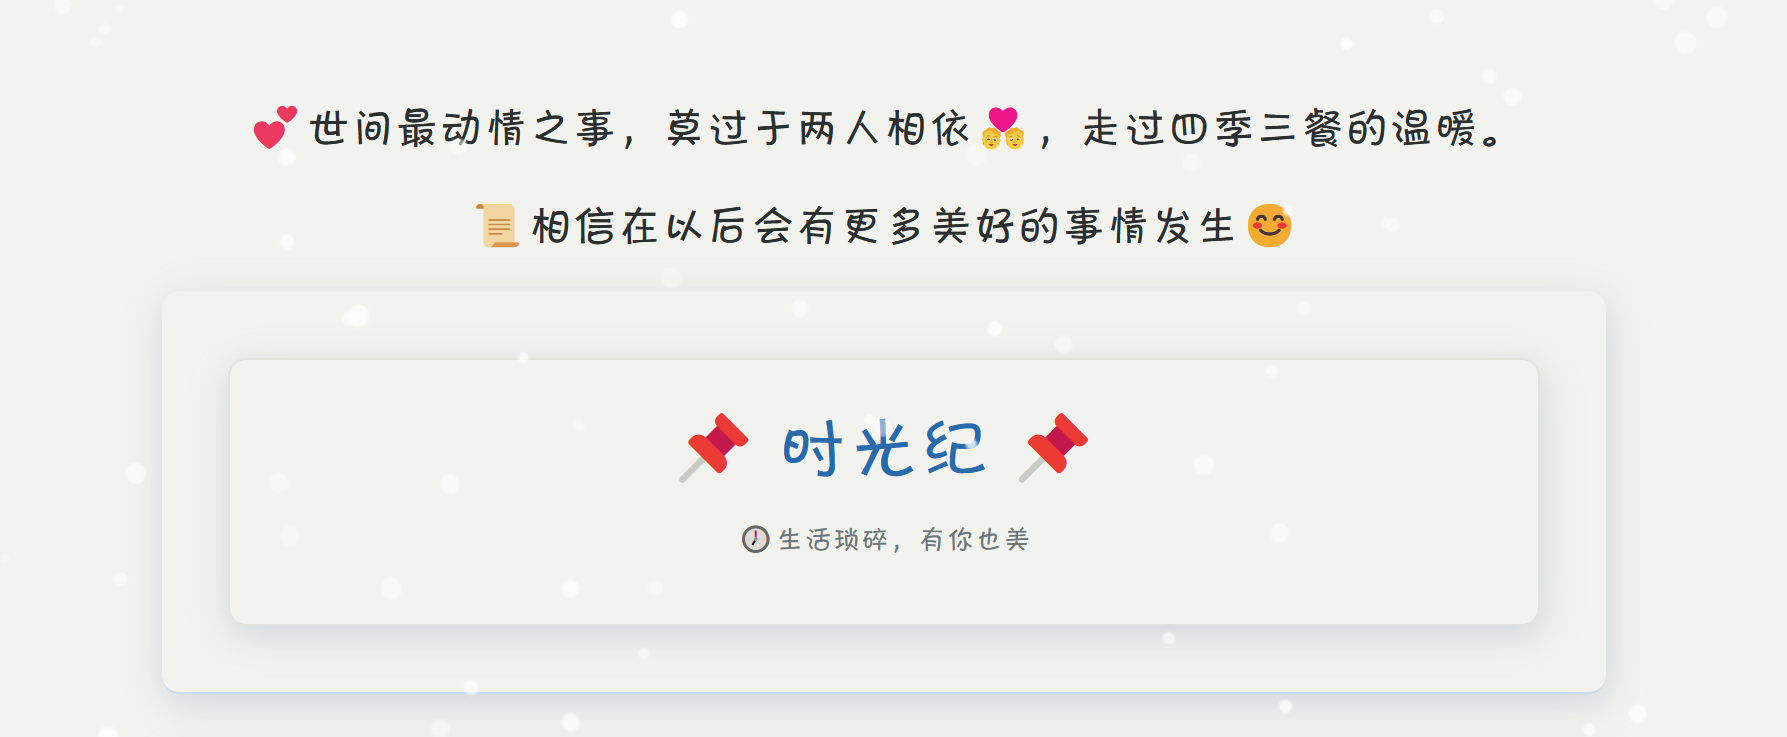
其他页面显示 将上面的代码复制到其他页面的对应位置,我将其放到了点点滴滴页面,即 index.php文件中下列位置,并进行了样式修改。
效果如图:
至此时光机页面就建成了。
发送内容 怎么以管理员的身份发送说说到时光机呢?首先使用管理员账号登录网站后台,点击右上角的网站即可以管理员的方式访问网站了。
此时进入时光机页面就能够看到文字输入框了
之前也有说过,可以注册多个管理员一起管理网站,使用不同的管理员身份发布说说,新增管理员用户时电子邮件最好选择QQ邮箱,方便在说说发布区左侧能够显示个人的头像。
最后 这些教程大多直接复制自他人,少部分自己整理、添加,也是记录,也是备忘。
其实情侣主题不用太花里胡哨,我们我们能做到在记录彼此的生活基础之上看起来赏心悦目就可以了,鉴于并不是两个人都会使用Markdown语法,所以可能实际效果只能是由一个人来完成,但是等到时间一长,再往回看的时候,我们的回忆有了装载的容器,我们就可以想起很多很多已经忘记的感动。
99,久久
生活太苦了,你就是最美好的甜
参考资料
Brave主题: https://blog.zwying.com/archives/59.html
Brave项目地址: https://github.com/zwying0814/Brave
@秦枫鸢梦: https://blog.zwying.com/
LoveXXzhoudedi插件项目地址:https://gitee.com/LinkXiaoZhou/LoveXXzhoudedi
吡咯爱成环:https://mp.weixin.qq.com/s/r9_TQwgV3UuML5eVTy55lw
随机api接口:https://www.ppilab.com/docs-sweet.html